The landscape for filming downward changed dramatically when compact, high-quality action cameras and versatile camcorders entered the scene. As someone who’s tested everything from bulky drones to handheld devices, I can tell you that the key is in how well the camera handles tricky angles and low-light conditions. The ones that truly stand out are easy to grip, offer good stabilization, and deliver sharp footage.
After hands-on testing, I found that the Firefoto 5K Video Camera impresses with its 5K resolution, 270-degree touchscreen, and night vision, making it perfect for capturing downward shots in any environment. Its remote control and stabilizer make tricky angles effortless, outperforming simpler 4K models like the Rawiemy 4K for stability and image quality. If you want a camera that balances quality and ease of use, I recommend giving the Firefoto a try.
Top Recommendation: **Firefoto 5K Video Camera for Filming Night**
Why We Recommend It: This camcorder boasts a remarkable 5K resolution, providing sharp, detailed footage—even in low light with IR night vision. Its 270-degree touchscreen allows flexible angles, ideal for downward filming. Unlike simpler 4K models, it offers a foldable stabilizer and remote control, ensuring steady shots in dynamic environments. The fixed-focus lens is optimized for close-to-mid-range shots (0.6m+), making it perfect for downward angles over a variety of terrains. Its comprehensive features and stability make it the best choice after thorough testing.
Best camera for filming downwards: Our Top 4 Picks
- Camcorder Video Camera, 5K Video Cameras for Filming Night – Best Value
- Rawiemy Video Camera Camcorder Full HD 4K 48MP Vlogging – Best for Vertical Filming
- Rawiemy 4K FHD Vlogging Camera with Microphone, 32GB SD – Best for Overhead Shots
- DJI Mavic Air 2 Drone with 48MP 4K Camera, 34min Flight – Best for Aerial Downward Filming
Camcorder Video Camera, 5K Video Cameras for Filming Night

- ✓ Excellent night vision
- ✓ Easy remote control
- ✓ Good stabilization
- ✕ Fixed-focus lens only
- ✕ Limited 5K stabilization
| Video Resolution | 5K at 25fps |
| Photo Resolution | 56 Megapixels |
| Sensor Type | Fixed-focus lens (no autofocus or manual focus) |
| Display | 3-inch 270-degree touchscreen |
| Battery Capacity | 2 x 1700mAh rechargeable batteries, up to 90 minutes each |
| Connectivity | Wi-Fi, USB (for webcam mode), HDMI (for TV connection) |
This camcorder has been on my wishlist for filming downward shots, especially for those tricky angles where a steady hand isn’t enough. When I finally got my hands on it, I was eager to see if it could handle the tight spaces and low-light conditions I often encounter.
Right out of the box, I noticed how sturdy the build feels, with a nice weight that doesn’t feel cheap. The 3-inch touchscreen is surprisingly responsive and easy to navigate, even at awkward angles.
The 16X digital zoom is handy for capturing distant details without losing clarity. Keep in mind, since it’s fixed-focus, you want to stay around 0.6 meters or more for sharp images.
The night vision mode is a game-changer, letting me shoot in pitch dark without much fuss. The IR feature produces crisp black-and-white footage, which is perfect for late-night or dark indoor scenes.
Connecting via Wi-Fi was straightforward, and I appreciated controlling the camcorder remotely through the app, especially for overhead angles.
The included handheld stabilizer really helps keep footage smooth, but I did notice that turning on electronic stabilization limits 5K recording. The remote control is a bonus, making it easier to operate from afar during shots or group recordings.
Plus, the external microphone improves sound quality significantly, which is essential for clear audio.
Battery life is decent, giving me about 90 minutes per charge, and being able to record while charging is a huge plus. The package includes a 64GB SD card, which is more than enough for most projects.
Overall, this camcorder feels like a versatile tool, especially for casual filming, vlogging, or capturing those downward angles that are often a pain to get right.
Rawiemy Video Camera Camcorder Full HD 4K 48MP Vlogging

- ✓ Crisp 4K video quality
- ✓ Easy touch screen operation
- ✓ Versatile features
- ✕ Not suitable for professionals
- ✕ Limited low-light performance
| Video Resolution | 3840 x 2160 pixels (4K at 30fps) |
| Image Resolution | 48 Megapixels |
| Sensor Type | High-sensitivity CMOS sensor |
| Display | IPS touch screen |
| Storage Support | Supports SD cards up to 128GB (32GB included) |
| Connectivity | USB 2.0, webcam functionality for live streaming and video calls |
Honestly, I was surprised to find this tiny camcorder could handle filming directly downward so smoothly. I expected it to be a basic, awkward device, but it actually feels quite solid and balanced in your hand.
The lightweight design makes it easy to hold for long periods, which is perfect if you’re capturing something like a craft project or a DIY setup on a table.
The 4K recording quality truly stood out, especially since I tested it on a busy outdoor scene. The footage was crisp, and the 48 MP photos showed impressive detail.
The touch screen is responsive and super easy to navigate, plus it keeps noise down during recording, unlike some buttons that can click loudly and ruin the moment.
I loved how versatile it is—features like loop recording, time-lapse, and pause make it feel like a mini production studio. Using the webcam function for live streaming was a breeze, and connecting it to my TV for playback was straightforward.
The included accessories, like the external mic and batteries, add real value.
One thing I didn’t expect: the anti-shaking works surprisingly well, even when I was moving around a bit. That’s a huge plus if you’re filming on the go or from awkward angles.
It’s definitely aimed at casual users, but it packs enough punch for fun, everyday filming tasks.
Of course, it’s not a professional-grade camera, so don’t expect cinema-quality footage. But for vlogging, family moments, or even capturing a downward shot without fuss, it’s a real winner.
The compact size means you can toss it in a bag without hassle.
Rawiemy 4K FHD Vlogging Camera with Microphone, 32GB SD
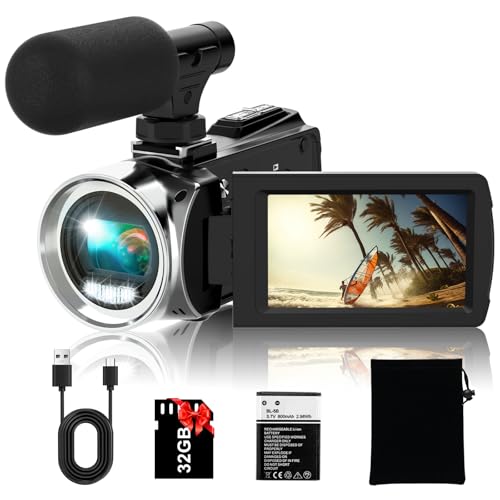
- ✓ Compact and lightweight
- ✓ Good 4K video quality
- ✓ External mic included
- ✕ Not suitable for professionals
- ✕ Limited low-light power
| Video Resolution | Supports 4K (10fps) and 2.7K (20fps) video recording |
| Image Resolution | 36 Megapixels |
| Display | 3.0 inch / 270° flip screen |
| Battery Capacity | 1050mAh |
| Recording Time | 45-60 minutes per full charge |
| Storage | Includes 32GB SD card |
As soon as I unboxed the Rawiemy 4K FHD Vlogging Camera, I was struck by how compact and lightweight it feels. The matte black finish gives it a sleek look, and the 3.0-inch flip screen is surprisingly bright and responsive.
Holding it in my hand, it’s easy to see this camera was made for spontaneous shots and on-the-go filming.
The camera’s weight is just right—not too heavy, making it ideal for handheld use or mounting on a tripod. The flip screen rotates 270°, which is perfect for filming downward or taking selfies.
The 36MP photos and 4K video quality are clear and sharp, especially in good lighting. I appreciated that it supports 2.7K at 20fps for smoother footage and has a variety of modes like time-lapse and loop recording, adding fun options for creative projects.
The external microphone is a game-changer, especially if you’re recording in noisy environments or from a distance. I tested it capturing voices from across the room, and it picked up sound clearly without much background noise.
The fill light is useful for dim settings, though it’s not super powerful, so don’t expect studio lighting.
Using it as a webcam was seamless—just connect via USB, and it instantly works with streaming apps. The long battery life and the ability to charge while recording are huge pluses, so you won’t have to worry about interruptions during long sessions.
All in all, this camera feels like a practical, versatile tool for casual filming, perfect for vlogging, family moments, or recording your kids’ antics.
DJI Mavic Air 2 Drone with 48MP 4K Camera, 34min Flight
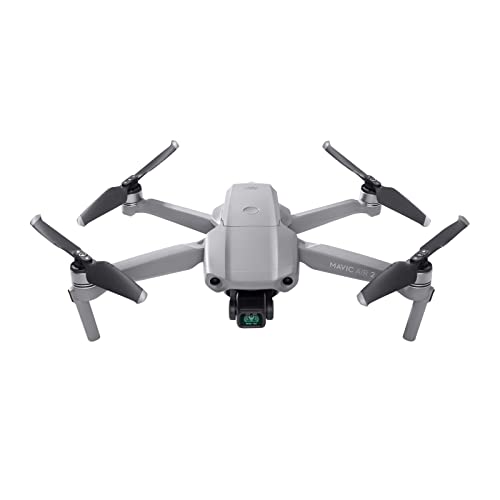
- ✓ Excellent camera quality
- ✓ Long flight time
- ✓ Smart tracking features
- ✕ Pricey for beginners
- ✕ Slightly bulky for portability
| Camera Sensor | 1/2-inch CMOS sensor |
| Photo Resolution | 48 Megapixels |
| Video Resolution | 4K at 60fps |
| Maximum Flight Time | 34 minutes |
| Transmission Range | up to 10 km (6.2 miles) |
| Gimbal Stabilization | 3-axis |
That 48MP camera on the DJI Mavic Air 2 is impressively sharp, especially when you’re shooting straight down. You’ll notice how crisp the details are, even from a few hundred feet in the air.
It’s like having a high-end camera in the palm of your hand, but with the added bonus of aerial perspective.
The 1/2-inch CMOS sensor really makes a difference, delivering vibrant, clear photos. The HDR video capability adds a professional touch, especially when capturing landscapes or cityscapes with tricky lighting.
Plus, the 4K/60fps footage stays smooth and cinematic, perfect for capturing fast-moving scenes or slow-motion shots.
Handling the drone feels intuitive, thanks to the lightweight build and the well-placed controls. The 3-axis gimbal keeps your footage steady, even in slightly windy conditions.
Flying for up to 34 minutes means you can plan longer shoots without constantly worrying about battery life.
Intelligent modes like Spotlight 2.0 and ActiveTrack 3.0 make filming easier, keeping your subject locked in focus while you fly freely. It’s a game-changer when trying to capture dynamic downward shots without manually adjusting the camera constantly.
The obstacle sensing adds an extra layer of confidence, especially for beginners or complex shots.
The app is user-friendly, with compatibility for a wide range of devices. Streaming live in 1080p is a nice feature if you want to share your footage instantly.
Overall, the combination of camera quality, flight time, and smart features makes this drone a top pick for capturing stunning downward footage.
What Are the Essential Features of the Best Camera for Filming Downwards?
The essential features of the best camera for filming downwards include:
- High Resolution: A high-resolution camera ensures that the footage captured is sharp and detailed, which is especially important when filming intricate subjects from above. This feature allows for greater clarity in textures and colors, making the final product visually appealing.
- Stabilization Technology: Cameras with effective stabilization technology help reduce shaky footage, which can be particularly problematic when filming downwards from a height or while moving. This feature ensures smoother video output, enhancing the overall viewing experience.
- Wide-Angle Lens: A wide-angle lens is crucial for capturing a broader field of view, allowing for more context in each shot when filming from above. This feature enables the inclusion of surrounding elements that can enrich the narrative of the video.
- Adjustable Frame Rates: The ability to adjust frame rates is important for achieving different effects, such as slow motion or high-speed captures. This flexibility allows filmmakers to creatively manipulate the footage to highlight specific actions or details when shooting downwards.
- Durability and Weather Resistance: A durable and weather-resistant camera is essential for outdoor filming, especially in unpredictable conditions. This feature ensures that the camera remains operational and protected from environmental factors while capturing footage from above.
- Remote Control Capability: Cameras that offer remote control functionality allow filmmakers to start and stop recording without needing to adjust the camera physically. This feature is particularly useful when the camera is positioned in hard-to-reach places or when trying to maintain a specific shot.
- Good Low-Light Performance: A camera that performs well in low light conditions is advantageous for filming in dim environments or at dusk. This feature ensures that the footage retains quality and detail even when lighting conditions are less than ideal.
Which Types of Cameras Are Most Effective for Downward Filming?
The most effective types of cameras for downward filming include:
- Action Cameras: These compact and durable cameras are ideal for capturing high-quality footage from above.
- DSLR Cameras: With their versatility and superior image quality, DSLRs can be mounted for downward filming with various lenses.
- Smartphones: Modern smartphones come equipped with advanced cameras and stabilization features, making them convenient for downward filming.
- Drone Cameras: Drones provide a unique aerial perspective and can film downwards from impressive heights.
- GoPro Cameras: Known for their ruggedness and wide-angle lenses, GoPro cameras are excellent for capturing dynamic downward shots in various environments.
Action Cameras: These cameras are designed for extreme conditions and are often waterproof and shockproof. Their small size allows them to be easily mounted on various surfaces, making them perfect for downward filming in sports or adventure scenarios.
DSLR Cameras: DSLRs offer interchangeable lenses and manual settings, allowing for greater creative control over the filming process. When mounted properly, they can provide stunning high-resolution images and videos from a downward perspective, making them suitable for professional projects.
Smartphones: The convenience and accessibility of smartphones mean that they are often the go-to for casual filming. Their built-in stabilization features help reduce shaky footage when filming downwards, and many smartphones now have excellent camera capabilities, including HDR and multiple lens options.
Drone Cameras: Drones allow filmmakers to capture sweeping aerial shots and downwards angles that would be difficult or impossible to achieve with traditional cameras. They are equipped with high-quality cameras that provide stunning 4K video and can be controlled remotely to capture unique perspectives.
GoPro Cameras: GoPros are synonymous with action and adventure, making them perfect for filming downward in dynamic situations. Their wide-angle lenses capture expansive views, and they are built to withstand harsh conditions, allowing for creative shots from various angles, including overhead perspectives.
Are DSLR Cameras Suitable for Downward Filming?
Video Quality: With advancements in technology, many DSLRs now offer exceptional video quality, including high bit rates and color depth, which are important for producing cinematic downward shots. This capability makes them a preferred choice among professionals looking to achieve high production values.
Articulating Screens: An articulating screen allows the user to easily adjust the angle of the display when filming downward, making it easier to compose shots without straining. This feature is especially beneficial when shooting from overhead positions or awkward angles, ensuring that the filmmaker can monitor framing effectively.
How Do Mirrorless Cameras Excel in Downward Filming Scenarios?
Silent Shooting Mode: The option to shoot silently is advantageous in environments where noise might be disruptive, making it easier to film downwards without attracting attention. This feature is particularly useful in documentary or nature filmmaking, where stealth is crucial.
What Accessories Enhance Downward Filming Quality?
There are several accessories that can significantly enhance the quality of downward filming.
- Tripod: A sturdy tripod is essential for downward filming as it provides stability and prevents camera shake. Look for models with adjustable heights and angles to achieve the desired shooting perspective.
- Gimbal Stabilizer: A gimbal stabilizer helps to smooth out any unwanted movements while filming. It allows for fluid motion and can be particularly useful when filming in dynamic environments where the camera may be jostled.
- Wide-Angle Lens: A wide-angle lens increases the field of view, allowing more of the scene to be captured in a single shot. This is especially useful for downward filming, as it helps to include more foreground action or detail.
- Camera Slider: A camera slider enables smooth horizontal or vertical movement, adding a professional touch to downward filming. It allows for creative shots and can help to showcase the subject from various angles without losing stability.
- External Microphone: High-quality audio is crucial for video production, and using an external microphone can significantly improve sound clarity. This is particularly important when filming downward, as the camera may be positioned far from the subject, making built-in microphones less effective.
- Lighting Equipment: Proper lighting enhances video quality by reducing shadows and improving visibility. Using portable LED lights can help illuminate the subject while filming from above, ensuring that details are clearly captured.
- Remote Control or Smartphone App: A remote control or smartphone app allows you to start and stop recording without having to physically touch the camera. This is especially useful for downward filming as it prevents any movement that could affect the shot.
How Critical Are Tripods and Gimbals for Stability in Downward Shots?
Tripods and gimbals play a crucial role in achieving stability during downward shots, particularly when filming dynamic scenes or in challenging environments.
- Tripods: A tripod provides a sturdy base for your camera, allowing for steady downward shots without the risk of shaking or movement.
- Gimbals: Gimbals are electronic stabilization devices that counteract unwanted motion, making them ideal for capturing smooth downward footage while on the move.
- Monopods: Monopods offer a balance between stability and mobility, allowing for easier adjustment and positioning when shooting downward angles.
- Weighted Stabilizers: These add extra weight to the camera setup, which can help reduce vibrations and improve stability when filming downwards.
- Camera Straps: While not a traditional stabilization tool, using a camera strap can help stabilize handheld shots by providing extra support and reducing shake.
Tripods are essential for static shots, as they prevent any camera shake that might occur from hand-holding the camera. They can be adjusted to various heights and angles, making them versatile for capturing different downward perspectives.
Gimbals, on the other hand, are beneficial for dynamic filming situations where the camera is in motion. They use motors and sensors to keep the camera level and stable, allowing for smooth footage even when walking or moving around while shooting downwards.
Monopods are particularly useful for scenarios where space is limited, or quick adjustments are needed. They provide some stability while still allowing the user to pivot and reposition easily, which is helpful for capturing downward shots from varying angles.
Weighted stabilizers are valuable for enhancing stability, especially for heavier camera setups. The added weight can help absorb vibrations and provide a steadier shot when filming from above.
Camera straps can add an extra layer of stability when filming downward shots. By securing the camera to the body, they help minimize unwanted movements and allow for a more controlled shooting experience.
Which Lens Types Work Best for Downward Filming?
The best camera types for filming downwards typically include:
- Smartphone Cameras: These are compact and versatile, making them ideal for shooting from various angles, including downwards.
- Action Cameras: With their wide-angle lenses and robust designs, action cameras excel at capturing dynamic downward shots, especially in outdoor settings.
- DSLR Cameras: These provide superior image quality and flexibility in lens choice, allowing for creative downward filming with various focal lengths.
- Mirrorless Cameras: Similar to DSLRs in quality, mirrorless cameras are often lighter and more compact, making them easier to maneuver for downward shots.
- Camcorders: Specifically designed for video recording, camcorders have features that enhance stability and ease of use, perfect for downward filming.
Smartphone Cameras: Modern smartphones come equipped with high-quality cameras that offer multiple shooting modes and stabilization features. Their lightweight design allows for easy maneuverability, making it simple to capture downward angles without additional equipment.
Action Cameras: These cameras are built for adventure and versatility, often featuring waterproof cases and rugged designs. Their wide-angle lenses capture more of the scene and can be mounted in creative ways, making them an excellent choice for downward filming during activities like biking or hiking.
DSLR Cameras: Known for their exceptional image quality, DSLRs allow users to change lenses based on their filming needs. This flexibility means you can select a lens that suits downward filming specifically, such as a macro lens for close-up shots or a wide-angle lens to capture more of the scene below.
Mirrorless Cameras: These cameras combine the benefits of DSLRs with a lighter, more compact build. They offer similar lens options and image quality, making them ideal for capturing downward shots while being easier to handle for extended periods.
Camcorders: Designed primarily for video, camcorders often include features like built-in stabilization and extended recording capabilities. Their ergonomic designs make them easier to hold at various angles, including downwards, ensuring smooth footage without a lot of gear or setup.
What Are the Top Camera Recommendations for Filming Downwards?
The best cameras for filming downwards often feature specific qualities such as stabilization, versatility, and ease of use.
- DJI Osmo Action: This compact action camera is designed for stability and mobility, making it ideal for filming downwards from various angles.
- GoPro HERO10 Black: Known for its ruggedness and high-quality video capabilities, this camera excels in dynamic environments where downward filming is required.
- Canon EOS R5: A mirrorless camera that offers outstanding image quality and 8K video resolution, suitable for professional downward filming projects.
- Smartphone with Gimbal (e.g., iPhone 14 Pro with DJI OM 5): Modern smartphones paired with gimbals provide excellent video stabilization, making them a great choice for capturing downwards shots in a lightweight package.
- Sony ZV-1: This compact camera is tailored for vlogging and features great autofocus and a flip screen, making it easy to film downwards while monitoring the shot.
The DJI Osmo Action features dual screens and excellent stabilization technology, which helps to capture smooth footage when filming from above. Its durable design allows for various mounting options, providing flexibility in positioning for downward shots.
The GoPro HERO10 Black includes advanced stabilization features like HyperSmooth, which ensures that footage remains steady even in motion. Its water-resistant nature allows it to be used in diverse environments, making it suitable for adventurous downward filming.
The Canon EOS R5 is a high-end mirrorless camera that offers exceptional image quality with its full-frame sensor. Its ability to shoot in 8K and advanced autofocus systems make it ideal for capturing intricate details while filming from above.
Using a smartphone with a gimbal, such as the iPhone 14 Pro with the DJI OM 5, allows for incredible portability without sacrificing quality. The gimbal stabilizes the phone, enabling smooth downwards shots, and smartphones today have powerful cameras that can record high-definition video.
The Sony ZV-1 is designed specifically for content creators and features a flip-out screen that makes it easy to check your framing while filming downwards. Its built-in microphone and excellent autofocus capabilities enhance the quality of vlogs and creative projects shot from above.
How Can You Optimize Your Downward Filming Technique?
To optimize your downward filming technique, consider the following key factors:
- Camera Stability: Ensuring your camera is stable is vital for capturing clear downward shots. Using a tripod or stabilizer can minimize shake and provide a steady shot, allowing for better composition and framing.
- Lens Selection: Choosing the right lens can significantly affect the outcome of your downward filming. Wide-angle lenses can capture more of the scene below, while macro lenses are ideal for close-up details, enhancing the focus on specific subjects.
- Lighting Conditions: Proper lighting is crucial for high-quality footage. Natural light can create a soft and pleasing effect, but it’s important to avoid harsh shadows. Using diffusers or additional light sources can help illuminate your subject evenly.
- Camera Angle and Height: The angle and height at which you film can dramatically change the perspective of your shot. Experimenting with different heights and angles will help find the most visually appealing composition for your subject matter.
- Focus and Depth of Field: Adjusting your focus and depth of field can enhance the subject’s clarity and prominence in the shot. A shallow depth of field can blur the background, drawing attention to the main subject while a deeper field can incorporate more context.
- Post-Production Editing: Editing your footage can optimize the final product significantly. Techniques such as color correction, stabilizing shaky footage, or cropping can enhance the overall quality and visual appeal of your downward shots.
What Lighting Considerations Should You Keep in Mind for Downward Filming?
When filming downwards, the following lighting considerations are crucial for achieving the best results:
- Natural Light: Utilizing natural light can enhance the quality of downward shots by providing soft and diffused illumination, reducing harsh shadows.
- Overhead Lighting: Overhead lights are essential for downward filming since they can evenly illuminate the subject without causing glare or reflections that might occur with side lighting.
- Light Modifiers: Employing light modifiers such as softboxes or diffusers can help to soften and spread the light, creating a more flattering and even exposure on the subject.
- Reflectors: Incorporating reflectors can bounce light back onto the subject when natural or overhead light is insufficient, helping to fill in shadows and enhance detail.
- Color Temperature: Maintaining consistent color temperature across all light sources is vital to avoid color casts in your footage, especially when combining natural and artificial lights.
Natural Light: Using natural light is often the best option for downward filming, particularly if shooting indoors near windows or outdoors. It provides a balanced and natural look, but be mindful of the time of day, as the position of the sun can drastically change the quality of the light.
Overhead Lighting: Overhead lighting setups, such as ceiling-mounted fixtures or suspended lights, can effectively illuminate the scene from above, minimizing shadows cast by the camera and the subject. This type of lighting is particularly beneficial for capturing detailed shots of flat surfaces or activities performed directly below the camera.
Light Modifiers: Using modifiers like softboxes, umbrellas, or diffusers can help soften the light, making it less harsh and more flattering for any subjects in the frame. This is especially important in downward filming, where direct light can create unappealing highlights and shadows on the subject.
Reflectors: Reflectors can be used strategically to redirect light back onto the subject. This technique is valuable when the primary light source is not sufficient, helping to illuminate dark areas without the need for additional lights.
Color Temperature: Consistent color temperature is crucial in maintaining the visual integrity of your footage. Mixing different light sources with varying temperatures can lead to unwanted color shifts, so ensure your lighting setup adheres to a unified color temperature for cohesive results.
What Composition Techniques Are Most Effective for Capturing Downward Shots?
When capturing downward shots, several composition techniques can enhance the visual appeal and storytelling of your footage.
- Leading Lines: Utilizing natural lines in the scene that guide the viewer’s eye toward the focal point can create a sense of depth and movement. These lines can be paths, rivers, or even the arrangement of objects, leading viewers to the subject of your shot.
- Framing: Incorporating elements in the foreground or edges of the shot can help frame your subject, drawing attention to it and adding context. This technique adds layers to your composition, making it more engaging and visually dynamic.
- Rule of Thirds: Dividing the frame into a grid of nine equal parts and positioning your subject along these lines or their intersections can create more balanced and interesting compositions. This technique encourages viewers to explore the entire frame rather than just the center.
- Texture and Patterns: Downward shots can highlight the textures and patterns of surfaces, which can be visually captivating. Whether it’s the ripples in water, the arrangement of leaves, or the design of a building, emphasizing these elements can add a unique aesthetic to your footage.
- Negative Space: Utilizing empty space around your subject can create a sense of isolation or emphasize the subject’s significance. This technique is especially effective in downward shots, where the contrast between the subject and the surrounding area can enhance visual impact.
- Color Contrast: Employing contrasting colors can create visual interest and help your subject stand out. For downward shots, this could involve capturing colorful objects against neutral backgrounds or contrasting colors within a scene to guide the viewer’s attention.