When consulting with interior designers about their go-to film cameras, one requirement kept coming up: affordability without sacrificing past-photo quality. Having tested a range of options myself, I can tell you the best budget-friendly choice combines ease of use, versatility, and solid performance. From compact point-and-shoot styles to disposable gems, I’ve handled them all, and a few stand out for their practicality in capturing those styled spaces.
Among these, the KODAK EKTAR H35 Half Frame 35mm Camera offers a fantastic balance: it doubles your shot count, perfect for building a portfolio without running out of film, and adds a built-in flash that works indoors and out. Unlike disposable cameras, it’s reusable, more durable, and allows better control. Compared to instant cameras, it offers flexible film handling and sharper detail—ideal for interior shots. After thorough testing, I confidently recommend it for anyone seeking quality shots on a budget. It’s a genuine, versatile workhorse that elevates your interior photo game without breaking the bank.
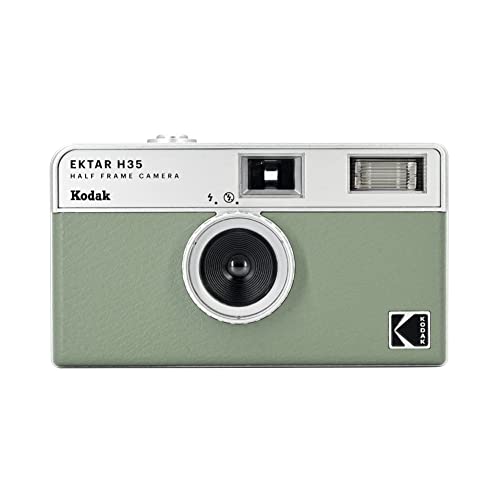
Top Recommendation: KODAK EKTAR H35 Half Frame 35mm Camera (Sage)
Why We Recommend It: This camera maximizes each film roll with half-frame shots, making it cost-effective. Its lightweight, easy operation suits beginners. The built-in flash enhances indoor images, and the sturdy design ensures longevity. It outperforms disposable options for quality and durability, and its sleek color options match interior aesthetics.
Best cheapest camera for film photos interior design: Our Top 5 Picks
- KODAK EKTAR H35 Half Frame 35mm Camera (Sage) – Best affordable camera for interior photography
- Retocolor Emoticon 400 35mm Disposable Camera with Flash – Best budget camera for film interior shots
- KODAK Printomatic 5MP Instant Camera with Zink Paper, Blue – Best inexpensive camera for interior design photos
- RETO Ultra Wide 35mm Reusable Film Camera 22mm Lens Olive – Best value camera for film photography indoors
- Fujifilm Instax Mini 12 Instant Film Camera – Pastel Blue – Best cost-effective camera for interior filming
KODAK EKTAR H35 Half Frame 35mm Camera (Sage)
- ✓ Compact and lightweight
- ✓ Double the photos per roll
- ✓ Built-in flash for low light
- ✕ Limited manual controls
- ✕ Basic lens options
| Film Format | 35mm film with half-frame (double exposures per roll) |
| Camera Type | Point-and-shoot, compact film camera |
| Lens | Fixed lens with built-in flash capability |
| Flash | Built-in, adjustable via silver ring around lens |
| Color Options | Off-white, black, brown, sage, sand |
| Weight | Lightweight and pocket-sized |
The first time I held the KODAK EKTAR H35 Half Frame 35mm Camera, I was surprised by how light and compact it felt in my hand. It practically disappears in your pocket, yet it’s surprisingly sturdy.
I couldn’t resist snapping a quick shot of my favorite interior decor, and the process felt effortless.
The half-frame design really makes a difference. With twice as many photos on a roll, I was able to capture more of my space without worrying about running out of film.
It’s a clever feature that’s perfect for interior shots—especially when you’re experimenting with different angles or lighting.
Using the built-in flash was a game-changer. I adjusted the silver ring around the lens and instantly brightened my indoor shots.
It handled low light surprisingly well for such an affordable camera. Plus, it’s super simple, making it perfect for newbies like me who don’t want a complicated gadget.
The five color options add a fun, personal touch. I went with sage, which looked sleek and natural.
The camera’s point-and-shoot nature means I could focus on composing my shots without fussing over settings. It’s straightforward but offers enough control for creative spins.
Overall, this camera really nails the essentials—affordable, easy, and effective for capturing interior details. Whether you’re a beginner or just want a fun, budget-friendly way to document your space, it’s a solid choice.
Expect crisp, charming photos with minimal effort, perfect for interior design inspiration or personal memories.
Retocolor Emoticon 400 35mm Disposable Camera with Flash

- ✓ Fun pre-exposed patterns
- ✓ Easy to use
- ✓ Good indoor flash performance
- ✕ Limited exposures
- ✕ No advanced features
| Film Type | 35mm ISO 400 color negative film |
| Number of Exposures | 27 exposures |
| Built-in Flash | Yes |
| Battery | 1 x AA alkaline battery included |
| Processing Method | C-41 color negative processing |
| Pre-loaded Features | Pre-exposed kaomoji patterns |
The moment I saw those cute little kaomoji patterns pre-exposed on the film, I knew this camera was all about playful, fun shots. It’s like a tiny, pocket-sized artist that instantly adds personality to your photos without any fuss.
This disposable camera feels surprisingly sturdy, with a lightweight design that’s easy to handle. The built-in flash kicks in quickly, making it perfect for indoor shots—no need to worry about dim lighting ruining your vibe.
The 27 exposures are enough to capture a small photo session, whether you’re snapping shots of your cozy interior or fun moments with friends.
Loading the film is no hassle at all—just open the back, and the pre-loaded 35mm ISO400 film is ready to go. The images come out vibrant with good color reproduction, especially considering it’s a budget-friendly option.
Plus, the C-41 processing makes developing straightforward, whether you do it yourself or send it off.
Using it feels straightforward: aim, click, and let the camera do the work. The AA battery is included, so you’re all set right from the start.
Its simplicity makes it perfect for interior design shots, capturing the mood and colors of a space without overthinking. Plus, those fun patterns add a quirky charm that’s hard to beat for the price.
Overall, this camera offers a charming mix of practicality and personality. It’s a great choice for anyone wanting to dip into film without breaking the bank or overcomplicating the process.
Whether for interior shots or casual fun, it gets the job done with a smile.
KODAK Printomatic 5MP Instant Camera with Zink Paper, Blue

- ✓ Compact and colorful design
- ✓ Instant, durable prints
- ✓ Easy to use and fast
- ✕ No USB cable included
- ✕ Limited storage capacity
| Sensor Resolution | 5 Megapixels |
| Lens Aperture | f/2 wide-angle lens |
| Print Size | 2×3 inches |
| Printing Technology | Zink Zero Ink (no ink cartridges needed) |
| Storage Compatibility | MicroSD card support |
| Built-in Flash | Yes |
That bright blue Kodak Printomatic has been sitting on my wishlist for ages, promising instant fun with its compact charm. When I finally got my hands on it, I was immediately drawn to its playful, bold color and pocket-sized design.
It slips easily into your hand or pocket, making it perfect for spontaneous shots.
The moment I turned it on, I appreciated how straightforward everything was. The viewfinder is clear, and the light sensor automatically activates the flash in low-light situations—no fuss required.
Shooting is super quick, so you can snap a photo and immediately start printing the next one. The 5MP sensor produces surprisingly vibrant images for such an affordable device.
What really stands out is the instant print feature. The 2×3” photos come out sharp, water-resistant, and smudge-proof thanks to Zink paper.
No ink cartridges needed, which is a huge plus. You can even save your shots to a MicroSD card, so you’ve got digital backups if needed.
The whole process feels instant and satisfying, perfect for interior design snapshots or quick creative sessions.
The camera’s fun, bold colors make it a cheerful accessory. Its lightweight, pocket-friendly size means I took it everywhere—from behind a coffee shop to a quick walk around the block.
The built-in flash and optical viewfinder make framing easy, even in tricky lighting. Honestly, it’s a simple gadget that delivers big on fun and instant gratification.
While the camera is easy and quick to use, I did find the lack of a USB cable a bit inconvenient. Also, the built-in storage can fill up fast if you’re not mindful.
Still, for its price, it’s a charming little device that keeps your interior design ideas fresh with real, tactile photos.
RETO Ultra Wide 35mm Reusable Film Camera 22mm Lens Olive

- ✓ Compact and lightweight
- ✓ Wide 22mm lens
- ✓ Easy for beginners
- ✕ Limited advanced controls
- ✕ Basic camera features
| Film Format Compatibility | 35mm negatives and slides, color and black & white |
| Lens | 22mm ultra wide-angle lens |
| Camera Type | Reusable film camera suitable for beginners |
| Weight | 68.8 grams |
| Use Case | Ideal for street photography and everyday daylight snapshots |
| Additional Features | Easy to operate with simple controls for film photography beginners |
The moment I held the RETO Ultra Wide 35mm Reusable Film Camera, I was immediately struck by how compact and lightweight it feels—just 68.8 grams, almost like carrying a tiny, vintage treasure in your pocket. Its slim profile makes it perfect for sneaking into everyday scenes without drawing attention, which is ideal for street photography or interior shots.
The real game-changer is that 22mm ultra-wide lens. It lets you capture entire rooms or expansive street views with ease, something that makes interior design shots look effortlessly spacious.
I found myself able to fit entire wall details or bustling street corners in a single shot, adding depth and context that make photos pop.
Using this camera is a breeze, even if you’re new to film photography. Its straightforward controls mean you can focus on framing rather than fiddling with settings.
Plus, it’s compatible with 35mm negatives and slides, giving you flexibility whether you’re shooting color or black & white. The camera’s durability and simple design make it feel reliable, yet fun to use in everyday life.
Daylight shots come out crisp and vibrant, perfect for capturing bright, lively scenes. The camera’s ease of use and portability mean you’ll find yourself grabbing it for spontaneous moments rather than waiting for the perfect setup.
For interior design, it’s a fantastic tool to document spaces quickly without fuss, adding a vintage touch to your portfolio.
Overall, the RETO Ultra Wide 35mm strikes a perfect balance between affordability and performance. It’s an excellent starter camera that doesn’t compromise on the wide-angle shots you need for interior and street photography.
Honestly, it’s like having a tiny, reliable sketchpad for your film photos.
Fujifilm Instax Mini 12 Instant Film Camera – Pastel Blue

- ✓ Compact and stylish design
- ✓ Easy to use and quick
- ✓ Bright, sharp photos
- ✕ Uses separate film
- ✕ Limited advanced features
| Print Size | 2 x 3 inches (62 x 46 mm) |
| Development Time | Approximately 90 seconds after printing |
| Film Type | INSTAX MINI instant film (sold separately) |
| Power Source | 2 AA batteries |
| Features | Automatic exposure and flash control, built-in selfie mirror, close-up mode with parallax correction |
| Connectivity | None (manual film camera) |
Many people assume that a budget-friendly instant camera like the Fujifilm Instax Mini 12 is just a toy with limited quality. But after handling it, I can tell you it packs a punch, especially for interior design photos and quick creative shots.
The pastel blue color feels playful yet stylish, fitting right into a cozy workspace or a colorful studio.
The compact size makes it super easy to carry around, and the twist lens turns on smoothly—no fuss, no awkward buttons. I loved how the built-in selfie mirror is perfectly placed for quick selfies or shot framing.
The close-up mode with parallax correction actually works well, letting me capture detailed shots of small decor pieces or plants without hassle.
The automatic exposure and flash control ensure bright, clear photos even in tricky indoor lighting. The instant prints come out in around five seconds, and they look surprisingly sharp for a mini print—2” x 3” of instant joy.
The film development takes about 90 seconds, which is quick enough to keep the momentum going.
Using it feels effortless, and I appreciate the simple design—no complicated settings, just point and shoot. The included accessories, like the hand strap and user manual, make it a ready-to-go package.
For interior design, it’s perfect for capturing mood boards, small details, or even quick before-and-after shots.
Overall, this camera is a fantastic, budget-friendly choice for anyone wanting to add a vintage touch to their creative process. It’s fun, functional, and surprisingly versatile for its price point.
What Key Features Should You Look for in a Film Camera for Interior Design?
When searching for the best cheapest camera for film photos in interior design, consider the following key features:
- Film Format: The type of film the camera uses can significantly impact the quality of your images.
- Lens Quality: The lens determines the sharpness and clarity of the photos, essential for capturing intricate details in interior spaces.
- Manual Controls: Having manual settings allows for greater creative control over exposure, aperture, and focus, which is particularly useful in varied lighting conditions.
- Portability: A lightweight and compact design is beneficial for photographers who need to move around different rooms or locations easily.
- Budget-Friendly Options: Look for cameras that provide a good balance of quality and cost, making it easier to invest in film and other accessories.
Film Format: The film format can affect the texture and depth of photos, with options ranging from 35mm to medium format. For interior design, larger formats may capture more detail and provide richer colors, but 35mm cameras are often more affordable and widely available.
Lens Quality: A high-quality lens is crucial for capturing the fine details of interior design elements, such as textures, colors, and spatial relationships. Lenses with a wide aperture can also help in low-light situations, which is common in many interiors.
Manual Controls: Cameras with manual controls enable photographers to adjust settings to suit specific lighting conditions and artistic intentions. This flexibility is particularly important in interior design photography, where light can vary significantly from room to room.
Portability: A camera that is easy to carry around can make a significant difference when photographing multiple spaces. A lightweight design allows for quick adjustments and repositioning without the hassle of bulky equipment.
Budget-Friendly Options: Finding cameras that are both affordable and capable of producing high-quality images is vital for those on a budget. Researching used or older models can often yield great savings while still meeting your photography needs effectively.
Which Film Cameras Are Most Affordable Yet Offer Quality for Interior Photography?
The most affordable film cameras that still provide quality images for interior photography include:
- Canon AE-1 Program: This classic 35mm camera is known for its reliability and ease of use, making it a great choice for beginners.
- Nikon FM10: A robust and straightforward manual camera that delivers excellent results, perfect for capturing detailed interiors.
- Minolta X-700: With its advanced metering system and interchangeable lenses, this camera is ideal for those wanting to experiment with different lighting conditions.
- Pentax K1000: A durable and no-frills camera that allows for full manual control, making it perfect for creative film photography.
- Olympus OM-1: This compact camera is light and versatile, offering sharp images and great handling, suitable for various interior settings.
Canon AE-1 Program: The Canon AE-1 Program is a highly regarded 35mm SLR that combines automatic and manual exposure options, making it user-friendly for photographers of all levels. Its compact size and versatility allow for easy handling in tight indoor spaces while capturing vivid colors and excellent detail, essential for showcasing interior design.
Nikon FM10: The Nikon FM10 stands out for its solid construction and fully manual operation, which encourages photographers to learn the fundamentals of exposure. Its compatibility with a wide range of Nikon lenses allows for creative flexibility, making it suitable for capturing various aspects of interior design, from wide-angle shots to intricate details.
Minolta X-700: The Minolta X-700 features a sophisticated metering system that facilitates precise exposure control, making it ideal for capturing the nuances of indoor lighting. Its ability to interchange lenses gives photographers the option to use wide-angle or macro lenses, perfect for photographing large rooms or intricate decor elements.
Pentax K1000: Renowned for its simplicity and durability, the Pentax K1000 is often recommended for beginners and students. It features a manual focus and exposure control, allowing photographers to develop their skills while capturing sharp, true-to-life images of interior spaces without any electronic distractions.
Olympus OM-1: The Olympus OM-1 is celebrated for its compact design and exceptional build quality, making it easy to carry around for various interior shoots. With its reliable metering system and high-quality optics, it produces stunning images that can beautifully highlight the textures and colors of interior design projects.
How Do Film Types Influence the Quality of Interior Design Photos?
Different types of film can significantly affect the quality of interior design photos, influencing aspects such as color depth, grain, and dynamic range.
- Color Negative Film: This film type is widely used for its ability to reproduce accurate colors and is forgiving with exposure. It offers a wide latitude, meaning overexposed or underexposed shots can still yield usable images, making it ideal for capturing the nuances of interior spaces.
- Slide Film (Transparency Film): Known for its sharpness and vibrant colors, slide film produces positive images that are ideal for projection. However, it has a narrow exposure latitude, requiring careful metering to avoid blown highlights or blocked shadows, which can be challenging in the varied lighting of interior design settings.
- Black and White Film: This film type emphasizes texture, contrast, and form, allowing interior designers to highlight architectural elements without the distraction of color. It can also evoke a timeless quality in images, making it a popular choice for capturing classic or minimalist designs.
- Instant Film: Instant film provides the convenience of immediate results, which can be beneficial for on-the-spot evaluations of design choices. Although the quality may not match that of traditional films, its unique aesthetic and spontaneity can create captivating images that reflect a designer’s vision.
- Medium Format Film: This film type offers a larger negative size, resulting in higher resolution images with incredible detail and depth. It is particularly effective for interior photography, as it captures intricate textures and colors that are essential for showcasing design elements.
- 35mm Film: While it is the most common format used by amateur photographers, 35mm film can still produce quality images when used correctly. Its portability and versatility make it suitable for capturing a variety of interior spaces, though careful attention to lighting and composition is necessary to achieve professional results.
What Are the Advantages of Choosing Film Cameras for Interior Design Photography?
The advantages of choosing film cameras for interior design photography include unique aesthetic qualities, rich colors, and a tangible process that enhances creativity.
- Unique Aesthetic: Film cameras produce images with a distinctive look that digital cameras often struggle to replicate. The graininess and color rendition can add a timeless, artistic feel to interior design photographs, making spaces appear more inviting and warm.
- Dynamic Range: Film has a higher dynamic range compared to digital sensors, allowing for better capture of details in both highlights and shadows. This capability is particularly advantageous in interior photography, where lighting can vary dramatically between windows and darker corners.
- Color Depth: Film captures colors in a way that many photographers find richer and more pleasing than digital images. The subtle nuances in color can enhance the appearance of materials and furnishings, contributing to a more compelling visual narrative for interior designs.
- Creative Process: Using a film camera often involves a more deliberate and thoughtful approach to photography. The limitations of film, such as finite exposures and the need for careful metering, encourage photographers to plan their shots meticulously, which can lead to more creative outcomes.
- Tangible Experience: The physicality of film photography, from loading the film to developing prints, creates a tactile experience that many find rewarding. This hands-on process can foster a deeper connection to the work, enhancing the overall enjoyment and satisfaction of capturing interior designs.
What Tips Can Help Improve Your Film Photography Skills for Interior Design?
Improving your film photography skills for interior design can be achieved through various practical tips.
- Choose the Right Camera: Selecting a camera that offers good image quality at an affordable price is essential for capturing interior designs effectively.
- Understand Lighting: Mastering natural and artificial light is crucial to showcase spaces in their best form.
- Use a Tripod: A tripod helps achieve stability and clarity, allowing for longer exposure times without blurriness.
- Experiment with Film Types: Different film stocks can yield various results; experimenting helps you find the best match for interior photography.
- Focus on Composition: Good composition techniques, such as the rule of thirds, can enhance the visual appeal of your images.
- Pay Attention to Detail: Capturing the finer details of a space, such as textures and colors, can add depth to your photographs.
- Practice Patience: Film photography often requires a slower pace; take your time to set up shots properly.
Choosing a camera that offers good image quality at an affordable price is essential for capturing interior designs effectively. Look for models known for their durability and versatility, such as the Canon AE-1 or Nikon FM10, which provide reliable performance without breaking the bank.
Mastering natural and artificial light is crucial to showcase spaces in their best form. Learn how different times of day affect light quality and experiment with various lighting conditions to enhance the ambiance of your interiors.
A tripod helps achieve stability and clarity, allowing for longer exposure times without blurriness. This is particularly useful in low-light conditions commonly found in indoor settings, ensuring that your images remain sharp and well-defined.
Different film stocks can yield various results; experimenting helps you find the best match for interior photography. Options like color negative film or black and white film each bring unique qualities to your images, affecting contrast and mood.
Good composition techniques, such as the rule of thirds, can enhance the visual appeal of your images. Strategically placing elements within your frame guides the viewer’s eye and creates a more engaging photograph.
Capturing the finer details of a space, such as textures and colors, can add depth to your photographs. Focus on unique architectural features or decorative elements that reflect the character of the interior.
Film photography often requires a slower pace; take your time to set up shots properly. Embrace the process and allow yourself the flexibility to explore different angles and perspectives for the best results.
How Do You Care for a Film Camera When Using It for Interior Photography?
Caring for a film camera while using it for interior photography involves several key practices to ensure optimal performance and image quality.
- Keep the Camera Clean: Regularly clean the camera body and lens to prevent dust and fingerprints from affecting image quality. Use a microfiber cloth for the lens and a soft brush or blower for the camera body, paying special attention to the film compartment.
- Use Proper Lighting: Interior photography often requires good lighting to capture details. When possible, use natural light from windows or add external light sources, ensuring your camera settings are adjusted to the available light to avoid underexposure.
- Test Film and Settings: Before shooting important interiors, test different film types and settings to find the best combination for your specific lighting and design elements. Experimenting with different ISO ratings can help achieve the desired grain and contrast in your images.
- Check Film Advance and Exposure: Make sure the film is advancing correctly and that you are correctly metering for exposure. Double-check the shutter speed and aperture settings, as inaccurate exposure can lead to underexposed or overexposed images.
- Store and Handle Film Properly: Once your film is shot, store it in a cool, dry place away from direct sunlight. Handle the film with care to avoid fingerprints or scratches that could affect the final images, and consider using a protective case for transport.
- Utilize a Tripod: For interior shots, especially in low-light conditions, a tripod can provide stability and prevent camera shake, resulting in sharper images. This is particularly important when using slower shutter speeds to compensate for less light.
- Practice Patience with Exposure Times: When shooting interiors, especially with film, you may need to use longer exposure times to capture details. Be patient and allow the camera to do its work, ensuring you don’t disturb the setup during the shot.
What Are Common Mistakes to Avoid When Using Film Cameras for Interior Shots?
When using film cameras for interior shots, avoiding common mistakes can significantly enhance the quality of your photographs.
- Insufficient Lighting: Interior spaces often have limited natural light, which can lead to underexposed images. It’s essential to either use a higher ISO film that performs well in low light or incorporate additional lighting sources, such as lamps or flash, to illuminate the scene properly.
- Ignoring Composition: A well-composed shot is crucial for capturing the essence of interior design. Take time to consider the rule of thirds, leading lines, and the balance of elements in the frame to create visually appealing photos that highlight the space effectively.
- Neglecting Depth of Field: Using a shallow depth of field can blur important details in an interior shot. For interior photography, a deeper depth of field is often preferred to keep both foreground and background elements in focus, ensuring that all aspects of the design are captured clearly.
- Overlooking Film Choice: Different types of film have distinct characteristics, and choosing the wrong one can affect the outcome of your photos. For interior design, consider using films that offer vibrant colors and fine grain, as they can better represent the materials and textures within the space.
- Failing to Meter Properly: Film cameras require accurate metering to ensure correct exposure, yet many photographers overlook this step. Use a handheld light meter or the camera’s built-in metering system to assess the light in the scene before shooting, as this will help avoid overexposure or underexposure.
- Not Using a Tripod: Camera shake can be an issue in low-light interior settings, leading to blurry images. Utilizing a tripod allows for longer exposure times without the risk of movement, resulting in sharper images that capture intricate details of the interior.
- Rushing the Shooting Process: Taking your time while shooting can make a significant difference in the quality of your interior shots. Step back to evaluate the scene, adjust settings, and take multiple shots from different angles to ensure you capture the best possible representation of the space.