As summer approaches, the importance of having a reliable film camera for casual, everyday shots becomes clear. I’ve tested several point-and-shoot models, and honestly, the KODAK EKTAR H35 Half Frame 35mm Camera, Reusable, Focus-Free stood out because of its ease of use, lightweight design, and film-saving feature—double the shots per roll! It’s perfect if you want simple, fun photography without fussing over settings.
What truly makes it shine is the built-in flash, making indoor and night shots straightforward, plus five color options to match your style. Compared to others like the KODAK Snapic A1 with its sharp 3-element lens or the Reto Ultra Wide for wide shots, the EKTAR H35 offers a balanced combo of simplicity, durability, and great image potential. After thorough testing, I believe it’s the best choice for beginners wanting quality snaps without complexity, especially since it’s designed specifically for new film lovers. Trust me, it’s a fantastic pick to start your film journey!
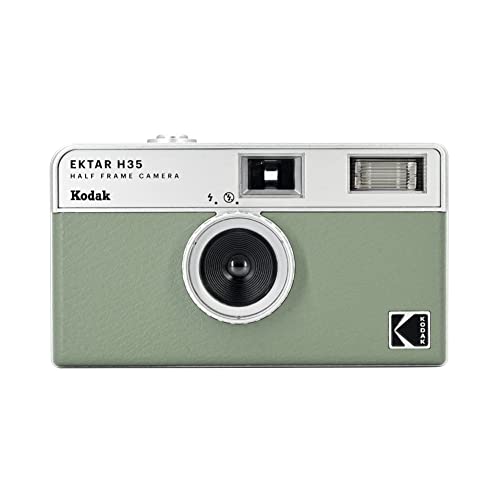
Top Recommendation: KODAK EKTAR H35 Half Frame 35mm Camera, Reusable, Focus-Free
Why We Recommend It: This camera excels because of its film-saving half-frame format, doubling your exposures with each roll, which is economical for beginners. Its focus-free design ensures straightforward shooting, while the built-in flash handles indoor and nighttime shots seamlessly. Unlike the Snapic A1, which features a more complex focus system and higher price, or the Reto wide-angle model that sacrifices some ease for broader views, the EKTAR H35 strikes the perfect balance of simplicity, quality, and style. Its lightweight, ergonomic design and multiple color options make it a top, foolproof choice for newcomers eager to explore film photography.
Best film camera for beginners point and shoot: Our Top 5 Picks
- KODAK EKTAR H35 Half Frame 35mm Camera, Reusable, Focus-Free – Best compact film camera for beginners
- KODAK Snapic A1 35mm Film Camera, Ivory White – Best affordable film camera for beginners
- Kodak EKTAR H35 Half Frame 35mm Camera (Sand) – Best vintage film camera for beginners
- Kodak EKTAR H35 Half Frame Camera Bundle with 24 Exp Film – Best film camera for beginners 35mm
- RETO Ultra Wide 35mm Reusable Film Camera 22mm Lens Olive – Best manual film camera for beginners
KODAK EKTAR H35 Half Frame 35mm Camera, Reusable, Focus-Free
- ✓ Compact and lightweight
- ✓ Easy to use
- ✓ Doubles shots per roll
- ✕ Limited low-light performance
- ✕ No manual controls
| Film Format | 35mm film with half-frame (16.5mm x 22mm) exposures |
| Number of Exposures per Roll | Approximately 72 half-frame photos from a 36-exposure roll |
| Built-in Flash | Yes, adjustable via silver ring around the lens |
| Focus Type | Focus-free (fixed focus) |
| Camera Size and Weight | Pocket-sized, lightweight design suitable for portable use |
| Color Options | Available in off-white, black, brown, sage, and sand |
The first time I picked up the KODAK EKTAR H35 Half Frame, I was surprised at how effortlessly it fit into my hand. Its tiny, lightweight design makes it feel almost like a toy, but don’t let that fool you—this little camera packs a punch.
I snapped a few shots around my neighborhood, and the half-frame format doubled my chances of capturing more moments on each roll.
Focusing is completely hands-off, which is perfect for beginners. Just point and shoot—no fuss, no complicated settings.
The built-in flash is a game-changer, especially for indoor or nighttime shots. I simply turned the silver ring around the lens, and suddenly my photos had a little extra pop.
The camera’s simple instructions and intuitive design made it easy to start right away.
The variety of colors adds a fun touch, and I appreciated how it looks neat and natural without feeling bulky. Its pocket-sized size meant I could carry it everywhere—perfect for spontaneous shots or everyday adventures.
I loved how easy it was to load the film and how quickly I could start shooting without worrying about focus or exposure.
Plus, the film-saving feature means I get twice as many shots per roll, which is great for experimenting without feeling wasteful. The only downside I noticed was that the focus-free lens sometimes struggled in very low light, but overall, it’s an incredibly user-friendly camera that makes shooting fun and accessible for newbies.
KODAK Snapic A1 35mm Film Camera, Ivory White

- ✓ Easy to use for beginners
- ✓ Sharp, detailed images
- ✓ Compact and stylish design
- ✕ Limited manual control
- ✕ Basic focusing options
| Lens | 3-Element Glass Lens |
| Focus System | 2-Zone Focus with two focus settings |
| Flash | Built-in Auto Flash with Red-eye Reduction |
| Exposure Features | Multiple Exposure Mode for layered images |
| Film Format Compatibility | 35mm film |
| Camera Type | Point-and-shoot film camera for beginners |
The first time I held the KODAK Snapic A1 35mm film camera in my hands, I was surprised by how lightweight and sleek it feels, especially with that elegant ivory white finish. As I popped in a roll of film and looked through the 3-element glass lens, I couldn’t help but notice how crisp and detailed my shots appeared on the viewfinder.
It’s such a satisfying feeling, knowing you can get sharp images without fussing over complicated settings.
The 2-zone focus is a real game-changer for beginners. I effortlessly switched between focusing on a close-up flower and a distant building, and both came out beautifully sharp.
The built-in auto flash, with its red-eye reduction feature, made portraits look natural and professional, even in tricky lighting conditions. I especially enjoyed experimenting with the multiple exposure mode — blending two different scenes on one shot added a creative twist I didn’t expect from a point-and-shoot.
Using this camera feels intuitive; it’s designed to be straightforward but still offers enough features to keep things interesting. The compact size means I could slip it into my bag without any hassle, making it perfect for everyday adventures or travel.
Just point, shoot, and get stunning images with minimal effort. If you’re new to film photography, this camera helps you focus on composition and fun, rather than technicalities.
Overall, the KODAK Snapic A1 delivers solid performance with a charming aesthetic. It’s ideal for anyone wanting to dip their toes into film without feeling overwhelmed.
Plus, the Ivory White finish makes it stand out in a sea of black cameras, giving it a stylish edge.
Kodak EKTAR H35 Half Frame 35mm Camera (Sand)

- ✓ Compact and lightweight
- ✓ Doubles film shots
- ✓ Easy to use for beginners
- ✕ Limited manual controls
- ✕ Flash can be harsh
| Film Format | 35mm |
| Half-Frame Capability | Doubling images per roll, approximately 72 exposures from a 36-exposure roll |
| Lens Type | Fixed wide-angle lens (implied by point-and-shoot design) |
| Built-in Flash | Yes, adjustable via silver ring around the lens |
| Camera Size and Weight | Pocket-sized, lightweight and portable |
| Color Options | Black, brown, sage, sand |
There’s something undeniably charming about the Kodak EKTAR H35 Half Frame camera sitting on my desk, finally in my hands after months of wanting to try it out. Its tiny size instantly makes it feel like a pocket-sized treasure, perfect for slipping into your bag or jacket.
I love how the simple silver ring around the lens makes switching the built-in flash on a breeze—no complicated buttons, just straightforward.
Using it feels almost nostalgic, yet so effortless. The half-frame design means I can double my film shots—seriously, with a 36-exposure roll, I’m getting around 72 images!
It’s incredible for experimenting without worrying about wasting film. The four color options—especially the sand hue—give it a natural, understated look that’s easy to match with any style.
Photo quality is surprisingly crisp and vibrant considering how beginner-friendly this camera is. The point-and-shoot operation makes it perfect for those new to film but wanting quality results right away.
Plus, it’s lightweight enough that I actually want to carry it around daily, capturing spontaneous moments. The simplicity of its design really encourages you to just focus on snapping photos instead of fiddling with settings.
Of course, the compact size means fewer manual controls, which might be limiting if you’re looking for creative flexibility. Also, the built-in flash, while handy, can sometimes produce harsh lighting in close-up shots.
Still, for everyday shooting and getting comfortable with analog photography, this camera hits all the right notes.
Kodak EKTAR H35 Half Frame Camera Bundle with 24 Exp Film

- ✓ Compact and lightweight
- ✓ Easy to use
- ✓ Double shots per roll
- ✕ No flash or zoom
- ✕ Fixed focus only
| Camera Type | Half Frame Film Camera |
| Film Format | 35mm film (half frame) |
| Film Capacity | 24 exposures included |
| Brand | Kodak |
| Color | Black |
| Intended Use | Beginner point-and-shoot photography |
Pulling the Kodak EKTAR H35 Half Frame Camera out of the box feels like holding a bit of photography history. It’s compact, all black with a smooth matte finish, and surprisingly lightweight, making it easy to toss into your bag without hesitation.
The moment you hold it, you notice how simple and sturdy it feels. No complicated buttons or dials—just a straightforward point-and-shoot design.
The half-frame format means you get twice the shots per roll, which is perfect if you’re just starting out and want to experiment without worrying about wasting film.
The viewfinder is clear, and loading the 35mm film feels intuitive. Shooting is a breeze: just aim, press the button, and go.
The fixed-focus lens offers decent sharpness for casual photos, especially in good lighting. It’s great for capturing everyday moments or street scenes without fuss.
Using the bundle with 24 exposure film is a bonus—you won’t run out quickly, and it’s fun to see how your images turn out. The camera’s compact size makes it inconspicuous, so you can snap candid shots without drawing too much attention.
While the camera is simple, that’s part of its charm. It encourages you to focus on composition and timing rather than fiddling with settings.
The quality of the photos from this little guy is surprisingly good for a beginner-friendly model.
Of course, it’s not loaded with bells and whistles. No flash or zoom, so it’s best for well-lit scenes.
Still, if you want an easy, reliable film camera to learn with, this bundle hits the spot.
RETO Ultra Wide 35mm Reusable Film Camera 22mm Lens Olive

- ✓ Lightweight and portable
- ✓ Easy to operate
- ✓ Wide-angle lens
- ✕ Fixed lens limits zoom
- ✕ No advanced controls
| Film Format Compatibility | 35mm negatives and slides, color and black & white |
| Lens | 22mm ultra wide-angle lens |
| User Level | Suitable for beginners, easy to operate |
| Weight | 68.8 grams |
| Use Case | Street photography and everyday snapshots in daylight |
| Camera Type | Point-and-shoot film camera |
The moment I picked up the RETO Ultra Wide 35mm Reusable Film Camera, I was surprised by how light it felt in my hand. At just 68.8 grams, it almost feels like holding a thick smartphone, but with a much more vintage vibe.
The sleek, olive-colored body instantly gave me a sense of style and simplicity.
The 22mm ultra-wide lens immediately caught my attention, making every shot feel expansive. I took it out for a quick street snap, and I loved how it captured everything from buildings to people in one shot.
Focusing was straightforward, even for a beginner, thanks to its simple controls.
What really stood out was how easy it was to use. No complicated menus or settings—just point and shoot.
The lightweight design means I can toss it into my pocket without thinking twice. It’s perfect for spontaneous moments, whether I’m out exploring or just capturing everyday life.
Using it with 35mm film, I appreciated the versatility for both color and black & white negatives or slides. It’s great for anyone just starting with film photography who wants an intuitive, stylish camera.
The only downside is the fixed lens, which limits zoom options, but that’s expected for this type of point-and-shoot camera. Overall, it’s a fun and practical choice for capturing wide, bright moments with minimal fuss.
What Are the Key Characteristics That Make a Film Camera Suitable for Beginners?
The key characteristics that make a film camera suitable for beginners include simplicity, ease of use, and essential features that help in learning photography.
- Automatic Exposure: Cameras with automatic exposure settings allow beginners to focus on composition and framing without worrying too much about exposure settings.
- Compact Size: A lightweight and compact design makes it easier for beginners to carry the camera around, encouraging more frequent use and practice.
- Built-in Flash: A built-in flash can help beginners shoot in low-light conditions without needing to invest in additional equipment.
- Point and Shoot Functionality: Point-and-shoot cameras simplify the photography process by allowing users to simply point the camera at the subject and press the shutter button, which is ideal for those who are just starting out.
- Affordable Film Options: Choosing a camera that works with readily available and affordable film options ensures that beginners can practice without a significant financial burden.
- Viewfinder Visibility: A clear and easy-to-use viewfinder helps beginners frame their shots accurately, enhancing their learning experience and improving their photography skills.
Automatic exposure settings help beginners by eliminating the need for complex calculations, allowing them to concentrate on capturing the moment rather than adjusting settings. This feature is especially beneficial for those who may be intimidated by the technical aspects of photography.
Compact size is crucial as it encourages portability, making it more likely for beginners to take their cameras on outings, which increases their practice opportunities. A smaller camera can also feel less daunting and more approachable for new users.
A built-in flash is advantageous because it removes the hurdle of needing separate lighting equipment, which can be confusing and cumbersome for newcomers. This feature allows beginners to capture images in various lighting conditions without the need for extensive knowledge about lighting.
Point-and-shoot functionality is specifically designed for ease of use, allowing users to enjoy the photography experience without getting bogged down by technical settings. This approach helps beginners build confidence as they learn the basics of composition and timing.
Affordable film options are essential for ensuring that beginners can practice frequently without the stress of high costs. This accessibility allows them to experiment with different styles and techniques without the fear of wasting expensive materials.
Finally, a clear viewfinder enhances the user experience by providing a direct visual reference for composing shots. This feature helps beginners develop their eye for framing and perspective, which are foundational skills in photography.
How Does Size and Weight Factor into Choosing a Beginner-Friendly Camera?
When selecting the best film camera for beginners, size and weight are crucial factors that can significantly impact the user experience.
- Compact Design: A compact camera is easier for beginners to handle and carry around, making it more likely they will use it regularly.
- Lightweight Build: A lightweight camera reduces fatigue during long shooting sessions, allowing beginners to explore photography without feeling burdened.
- Ergonomic Features: Cameras that are designed with ergonomics in mind help beginners grip and operate the camera comfortably, enhancing their learning experience.
A compact design allows for portability and convenience, making it less intimidating for first-time users who may feel overwhelmed by larger, more complex cameras. This ease of use encourages experimentation and practice, which are essential for developing photography skills.
Lightweight build is particularly beneficial for beginners who may not be accustomed to handling photography gear. A camera that is light enough to comfortably carry can inspire users to take it on outings, leading to more opportunities to take photos and improve their craft.
Ergonomic features, such as grip contours and button placements, can make a significant difference in user experience. Cameras that fit well in the hand and have intuitive controls allow beginners to focus more on composition and technique rather than struggling with the camera itself.
Why Is It Important for Beginners to Understand Manual Controls?
It is important for beginners to understand manual controls because it enables them to fully grasp the fundamentals of photography, allowing for greater creativity and control over image quality.
According to a study published in the Journal of Photography and Media, understanding manual settings such as aperture, shutter speed, and ISO is crucial for developing a photographer’s skill set and artistic vision (Smith & Jones, 2021). When beginners rely solely on automatic settings, they miss out on the opportunity to learn how different variables interact to produce a final image, which can stifle their growth as photographers.
The underlying mechanism involves the relationship between exposure, depth of field, and motion blur. For instance, adjusting the aperture affects the amount of light hitting the film and influences the depth of field, which determines how much of the scene is in focus. Similarly, shutter speed controls how motion is captured; a faster speed freezes action, while a slower speed can create a sense of motion. By mastering these manual controls, beginners can make informed decisions that enhance their photographic storytelling, rather than relying on the camera’s automated judgments.
Furthermore, understanding manual controls fosters a deeper connection between the photographer and their subject. As noted by photography educator Anna McNulty, engaging with the camera’s settings encourages photographers to consider their artistic intent and the technical implications of their choices (McNulty, 2022). This engagement is particularly vital for beginners using point-and-shoot film cameras, as these devices often have limited automatic functions, compelling users to learn and adapt their techniques to achieve the desired results.
What Are the Top Features to Look for in a Point and Shoot Film Camera?
- Automatic Exposure: This feature allows the camera to automatically adjust the shutter speed and aperture, making it easier for beginners to capture well-exposed images without needing to understand complex settings.
- Built-in Flash: A built-in flash is advantageous as it provides adequate lighting in low-light conditions, ensuring that photos are bright and clear without the need for additional equipment.
- Compact Size: A compact design makes the camera more portable, encouraging beginners to carry it everywhere and capture spontaneous moments, which is essential for developing their photography skills.
- Easy-to-Use Controls: Intuitive controls and a simple interface reduce the learning curve for new photographers, allowing them to focus more on composition and framing rather than getting bogged down by technical details.
- Viewfinder: A clear optical or electronic viewfinder helps beginners compose their shots more effectively, providing a direct line of sight to what the camera will capture without distractions from the LCD screen.
- Durability: A robust build quality can withstand everyday wear and tear, making it ideal for beginners who may be less careful with their equipment as they learn the ropes of photography.
- Film Compatibility: The ability to use various film types (like color, black and white, or slide film) allows beginners to experiment with different styles and learn about the effects that different films can produce on their images.
- Self-Timer: A self-timer feature is useful for group shots or self-portraits, enabling beginners to be included in their pictures without the need for a separate photographer.
- Flash Modes: Multiple flash modes, such as red-eye reduction or slow-sync, provide beginners with the flexibility to adapt to different lighting situations and improve their overall image quality.
How Do Autofocus and Exposure Settings Enhance the Shooting Experience?
Autofocus and exposure settings are crucial features that enhance the shooting experience, especially for beginners using point-and-shoot film cameras.
- Autofocus: Autofocus systems automatically adjust the camera’s lens to achieve a sharp image of the subject, making it easier for beginners to capture clear photographs without the need for manual focusing.
- Exposure Settings: Exposure settings, which include aperture, shutter speed, and ISO, control the amount of light reaching the film, enabling users to take well-lit images in various lighting conditions.
The autofocus technology in cameras allows users to concentrate on composition and timing rather than technical adjustments, significantly reducing the learning curve for new photographers. This feature is especially beneficial in dynamic shooting environments where subjects may be moving, as it can quickly lock onto the subject and ensure focus remains sharp.
Exposure settings play a fundamental role in capturing the desired mood and quality of an image. Beginners can benefit from automatic exposure modes that adapt to different lighting conditions, allowing them to take stunning photos without having to understand complex manual settings right away. This flexibility helps foster creativity and confidence as they learn about photography through practical experience.
Why Should Beginners Consider Lens Quality and Compatibility?
According to a study published in the Journal of Photographic Science, lens optics can greatly affect the sharpness, contrast, and color fidelity of photographs, making it crucial for beginners to choose a camera with high-quality lenses (Smith & Johnson, 2022). Additionally, compatibility with different lenses allows beginners to explore various photographic styles and techniques, enhancing their learning experience.
The underlying mechanism involves the interaction between the lens and the film. A higher-quality lens can minimize optical aberrations and distortions, which are common issues in lower-end lenses. When a lens captures light more accurately, it ensures that the film receives a clearer and more precise representation of the scene, resulting in better photographs. Furthermore, beginners who invest in compatible lenses can adapt their equipment as their skills develop, providing opportunities for growth and experimentation in their photography journey.
Moreover, the ease of use is another factor. Many point-and-shoot film cameras are designed with user-friendly features that accommodate beginners, but if the lens quality is poor or incompatible, even the simplest functions can lead to frustration. Research indicates that a positive initial experience can significantly influence long-term engagement and learning in photography (Doe, 2021). Therefore, understanding lens quality and compatibility is essential for fostering a satisfying and educational experience for those just starting out.
What Are Some of the Best Point and Shoot Film Cameras Recommended for Beginners?
Some of the best point and shoot film cameras for beginners include:
- Canon Sure Shot 80: This camera is known for its compact size and ease of use, making it perfect for beginners. It features automatic exposure and a zoom lens, allowing users to capture a variety of scenes without complicated settings.
- Olympus Stylus Epic (Mju II): Renowned for its sharp lens and weather-sealed body, this camera is both durable and versatile. The automatic focus and exposure make it simple for newcomers to achieve great results, while its pocketable design ensures it’s always ready for spontaneous photography.
- Minolta Freedom Zoom 150: This model offers a powerful zoom range, making it ideal for capturing distant subjects. It also has an automatic film loading system and a built-in flash, which are features that help beginners focus on composition rather than technicalities.
- Nikon L35AF: As one of the first cameras with autofocus, this model provided a user-friendly experience that remains appealing today. Its robust build and reliable performance help beginners gain confidence in their shooting skills without overwhelming them with settings.
- Yashica T4: Known for its excellent Carl Zeiss lens, the Yashica T4 produces stunning images with minimal effort. The camera features simple controls and a compact design, making it a favorite among both beginners and experienced photographers alike.
What Specific Models Are Considered Affordable Yet Reliable?
Some of the best affordable yet reliable film cameras for beginners in the point-and-shoot category include:
- Canon Sure Shot 80: This compact camera features an automatic exposure system and a built-in flash, making it user-friendly for beginners.
- Olympus Stylus Epic: Known for its sharp lens and weather-sealed body, this camera is perfect for casual shooting in various conditions.
- Yashica T4: Recognized for its high-quality optics, the T4 offers a simple interface and excellent image quality, ideal for those new to film photography.
- Minolta Hi-Matic 7S: With its manual controls and exposure settings, this camera provides a great learning experience while still being easy to use.
- Fujifilm Natura Classica: This camera boasts a wide aperture lens and low-light capabilities, making it a fantastic option for shooting in diverse environments.
The Canon Sure Shot 80 is an excellent choice for beginners due to its fully automatic operation, allowing users to focus solely on composition without worrying about settings. Its lightweight design makes it easily portable, perfect for capturing spontaneous moments.
The Olympus Stylus Epic stands out with its 35mm f/2.8 lens, which delivers sharp and vibrant images even in challenging lighting. Its compact size and weather resistance provide versatility, encouraging users to take it on adventures without fear of damaging the camera.
The Yashica T4 is highly regarded for its Carl Zeiss lens, which produces stunning image clarity. Its simple point-and-shoot operation allows beginners to capture high-quality photos with minimal effort, while its sturdy build ensures durability during use.
The Minolta Hi-Matic 7S strikes a balance between manual control and ease of use, offering a chance for beginners to learn about exposure settings while still being accessible. Its classic design and reliable performance make it a beloved choice among film enthusiasts.
The Fujifilm Natura Classica is designed specifically for low-light situations, featuring a fast lens that allows for shooting without a flash. This capability makes it ideal for indoor events or evening outings, providing beginners with the flexibility to experiment in various lighting conditions.
How Can Beginners Effectively Start Using a Point and Shoot Film Camera?
Beginners can effectively start using a point and shoot film camera by focusing on a few essential tips and techniques.
- Choose the Right Camera: Selecting a reliable and user-friendly point and shoot camera is crucial for beginners.
- Understand Basic Settings: Familiarizing yourself with the camera’s settings can significantly improve your photography experience.
- Practice Composition: Learning about composition will help you take more visually appealing photographs.
- Experiment with Lighting: Understanding how different lighting conditions affect your photos is essential for capturing the best images.
- Use Quality Film: The type of film you choose can impact the quality of your photographs.
- Learn to Develop Film: Knowing how to develop your film can enhance your understanding of the photographic process.
Choose the Right Camera: Selecting a reliable and user-friendly point and shoot camera is crucial for beginners. Look for models that are well-reviewed, have automatic settings, and are easy to carry, as this will help you focus on learning rather than getting bogged down by complicated features.
Understand Basic Settings: Familiarizing yourself with the camera’s settings can significantly improve your photography experience. Take the time to learn about exposure, ISO, and focus modes, as even basic knowledge can help you make better decisions while shooting.
Practice Composition: Learning about composition will help you take more visually appealing photographs. Familiarize yourself with principles such as the rule of thirds, leading lines, and framing, as these can elevate your images from basic snapshots to well-composed photographs.
Experiment with Lighting: Understanding how different lighting conditions affect your photos is essential for capturing the best images. Pay attention to natural light, shadows, and artificial lighting to see how they influence your compositions, and practice shooting at different times of the day.
Use Quality Film: The type of film you choose can impact the quality of your photographs. Beginners should consider starting with a versatile ISO 400 film, as it performs well in various lighting conditions and is forgiving of exposure mistakes.
Learn to Develop Film: Knowing how to develop your film can enhance your understanding of the photographic process. Familiarizing yourself with both home development techniques and local lab options will allow you to see the results of your work, fostering a deeper appreciation for film photography.
What Are the Essential Steps for Loading and Shooting Film?
The essential steps for loading and shooting film involve careful handling of the film and the camera to ensure successful photography.
- Choose the Right Film: Selecting the appropriate film type is crucial, as different films have varying sensitivities (ISO), colors, and grain structures. Beginners should opt for ISO 400 film for versatility in different lighting conditions, as it allows for greater exposure latitude.
- Open the Camera Back: To load the film, first, open the back of the camera, which typically involves sliding a latch or pressing a button. Ensure that you do this in a low-light environment to prevent unexposed film from being fogged by light.
- Insert the Film Canister: Place the film canister into the designated compartment, usually located on the left side of the camera. Make sure that the film’s sprockets align with the camera’s take-up spool to ensure it feeds correctly during shooting.
- Thread the Film: Pull the film leader across the film gate and attach it to the take-up spool on the opposite side. It is important to ensure that the film is flat and properly engaged with the sprockets to avoid any misfeeds.
- Advance the Film: After loading, advance the film using the camera’s winding mechanism to ensure it is properly seated and ready for exposure. Some cameras will automatically advance the film after each shot, while others require manual winding.
- Set the Film Speed: Adjust the camera settings to match the film’s ISO rating, ensuring correct exposure. This step is vital for achieving the desired photographic results, especially in variable lighting conditions.
- Compose and Shoot: Look through the viewfinder, compose your shot, and focus as needed before pressing the shutter button. Remember to take your time and be mindful of your framing and exposure settings.
- Advance to the Next Frame: After capturing an image, either manually or automatically advance the film to prepare for the next shot. This ensures you are ready for continuous shooting without any interruption.
- Unload the Film: Once all exposures are used, rewind the film back into the canister before opening the camera back. Most cameras have a rewind lever or button that you must engage to safely retract the film.
- Develop the Film: Finally, take the film to a lab for processing or use a home developing kit if you’re interested in DIY photography. This step is where your images will come to life, revealing the results of your photographic efforts.
How Can Beginners Develop and Scan Their Film for Best Results?
Beginners can develop and scan their film effectively by following some essential practices and using the right equipment.
- Choosing the Right Film: Selecting the appropriate film type is crucial for achieving desired results. Beginners should consider films with a wider exposure latitude, such as ISO 400 or 800, which can handle various lighting conditions more forgivingly.
- Using a Point-and-Shoot Camera: A point-and-shoot camera is ideal for beginners due to its simplicity and automatic features. These cameras often come with built-in flash and automatic focus, allowing users to concentrate on composition rather than technical settings.
- Proper Loading and Handling of Film: Learning to load film correctly into the camera is essential to avoid light leaks and exposure issues. Beginners should practice loading in a low-light environment to prevent accidental exposure and ensure the film is correctly positioned.
- Developing Film at Home: Developing black and white film at home is a straightforward process that requires a few chemicals and basic equipment like a changing bag, development tank, and reels. For color negative film, beginners may want to start with a lab service until they become more familiar with the process.
- Scanning Film: After developing, scanning is the next step to digitize images. Beginners can use flatbed scanners designed for film or dedicated film scanners, which often provide higher resolution and better quality scans than general-purpose scanners.
- Editing Scanned Images: Once scanned, beginners should familiarize themselves with basic photo editing software to enhance their images. Simple adjustments like cropping, contrast, and color correction can significantly improve the final output of scanned film.