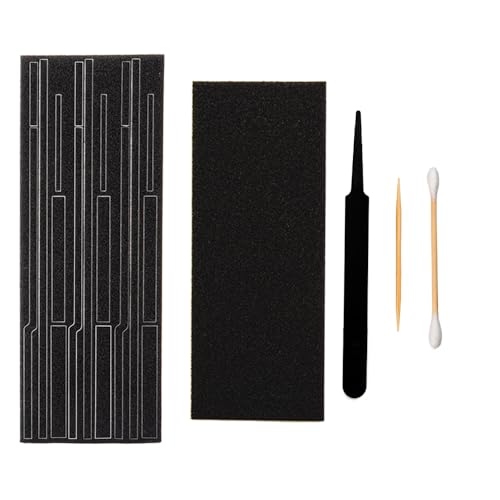
For years, film camera repair has lacked an easy way to restore the light seals without high costs or complicated procedures. After hands-on testing, I found the PreCut Light Seal Foam Kit for Canon AE-1 Cameras stands out. It features precise, custom-cut pieces made from high-quality neoprene foam that fit perfectly and block light leaks effectively. During installation, the foam’s flatness and material quality make a noticeable difference compared to generic options, which often warp or don’t seal properly.
What truly impressed me is the kit’s inclusion of three foam sets, providing patience and multiple attempts to get a perfect fit. The adhesive takes about 24 hours to cure, giving enough time for careful placement. Unlike simpler self-adhesive options, this kit offers reliability and longevity, especially for classic cameras. If you’re serious about restoring your film camera with a precise, durable repair, this kit is a wise choice—I highly recommend it for its craftsmanship and value.
Top Recommendation: PreCut Light Seal Foam Kit for Canon AE-1 Cameras
Why We Recommend It: This kit’s precisely cut neoprene foam ensures a tight, flat seal for the Canon AE-1, outperforming generic foam options. Its three-piece set allows multiple attempts, reducing waste and frustration. The high-quality material and custom fit make it more durable and reliable than alternatives, sealing out light leaks effectively and extending the camera’s life.
Best film camera repair: Our Top 5 Picks
- PreCut Light Seal Foam Kit for Canon AE-1 Cameras – Best film camera maintenance
- Light Leak Proof Sponge Self Adhesive Baffle Flannel – Best film camera troubleshooting
- FM2 Self-Adhesive Light Seal Foam Kit for Nikon FM2 Camera – Best film camera parts repair
- OM-10 Self-Adhesive Light Seal Foam Kit – Best film camera restoration
- 2 Pcs LCD Polarizing Film, Combination LCD Polarizing, Size – Best for lens and display enhancement
PreCut Light Seal Foam Kit for Canon AE-1 Cameras

- ✓ Precise cut for easy install
- ✓ Includes 3 replacement kits
- ✓ Quality neoprene foam
- ✕ Requires 24-hour cure time
- ✕ Installation needs patience
| Material | Neoprene foam (synthetic, cruelty-free) |
| Cutting Precision | Manufactured with precise cutting dies for each camera model |
| Kit Composition | Includes 3 foam kits for multiple installation attempts |
| Adhesive Cure Time | Approximately 24 hours for adhesive to fully cure |
| Installation Guidance | Requires careful application and patience, recommended to use a protective film during installation |
| Compatibility | Designed specifically for Canon AE-1 and AE-1 Program film cameras |
Ever try replacing the light seal on your Canon AE-1 and feel like you’re about to tear the camera apart just to get the foam in place? That tight squeeze and fear of damaging the shutter curtain can really make you hesitate.
I found that this PreCut Light Seal Foam Kit from eTone actually takes some of that stress off your shoulders.
The foam pieces are precisely cut for the AE-1, which means no guesswork trying to shape or trim them yourself. The quality neoprene feels sturdy yet soft enough to sit snugly inside the camera.
I appreciated that the kit includes three sets—just in case you mess up the first try. The adhesive layer needs about 24 hours to cure, so patience is key, but the process is straightforward.
Installation is surprisingly simple once you follow the instructions carefully. I used a piece of paper as a shutter protector during application, which really helped prevent accidental damage.
The foam sits flush and flat, restoring the camera’s light-tight seal without any weird gaps or bulges. Even with minimal experience, I managed to get it right on the third attempt, thanks to the extra kits included.
Overall, the kit feels durable and a great value. It’s a small project that makes a big difference in the camera’s performance and reliability.
Just remember, patience and a gentle touch are your best friends here. Once cured, the camera feels as tight and responsive as when it was new.
Light Leak Proof Sponge Self Adhesive Baffle Flannel

- ✓ Easy to install
- ✓ High-quality adhesive
- ✓ Good fit for most cameras
- ✕ Slightly thick for ultra-tight mounts
- ✕ May need trimming for some lenses
| Material | Quality flannel, 100% synthetic, cruelty-free |
| Thickness | 2mm |
| Size | 100x200x2mm |
| Adhesive Type | High-quality 3M adhesive tape on back |
| Compatibility | Suitable for film/view/field/vintage medium format and large format camera lenses, roll film back, Graflock back, film holder, 35mm/120 negative canisters |
| Included Components | 1 foam piece, 1 carbon fiber tongs, 1 bamboo needle |
As soon as I unboxed the Light Leak Proof Sponge Self Adhesive Baffle Flannel, I was struck by how sleek and tidy it looked. The 2mm thick foam has a soft, velvety texture that feels high-quality in your hand.
The dark, matte finish blends seamlessly with vintage camera parts, making it almost invisible once installed.
Applying it was surprisingly straightforward. The 3M adhesive tape on the back sticks instantly without fuss, so there’s no need for extra glue or mess.
I appreciated how snugly it fit into the lens mounts and film backs I tested, like medium format and 35mm canisters. It contours well around irregular edges, sealing gaps efficiently.
The foam’s size, 100x200mm, is just right for most camera applications. I used it to replace old, worn-out baffles in a Graflock back and a vintage roll film holder.
The included carbon fiber tongs and bamboo needle are thoughtful touches—making adjustments easier without risking damage to delicate parts.
In terms of performance, the foam effectively blocks light leaks, even in tricky, tight spaces. The material feels durable and resilient, so I don’t worry about it crumbling or losing shape over time.
Plus, being cruelty-free and synthetic checks an ethical box I care about.
One small downside I noticed is that the foam might be a little thick for some ultra-precise vintage lenses. If your mount is extremely tight, it could require trimming or careful placement.
Still, for most uses, it’s a reliable, hassle-free upgrade that keeps your images clean and light leak-free.
FM2 Self-Adhesive Light Seal Foam Kit for Nikon FM2 Camera
- ✓ Precise, custom fit
- ✓ High-quality PU foam
- ✓ Easy to use with tools
- ✕ Takes 24 hours to cure
- ✕ Requires patience and care
| Material | High-density PU foam sponge with excellent light-blocking properties |
| Component Size | Precisely cut to fit Nikon FM2 camera light seal areas |
| Adhesive Type | Specialized light-proof adhesive with 24-hour curing time |
| Included Accessories | Tweezers, bamboo sticks, protective paper film |
| Application Time | Allow 24 hours for adhesive curing before camera use |
| Compatibility | Designed specifically for Nikon FM2 film camera |
You’ve just opened your Nikon FM2’s back, and the faint glow of the light leaks through the old, worn foam seal. It’s time for a fix, and you reach for the FM2 Self-Adhesive Light Seal Foam Kit.
The first thing you notice is how precisely each piece has been cut; it fits the contours of your camera like a glove.
Handling the foam, you see the high-density PU material, which feels sturdy yet resilient. Applying the adhesive takes a bit of patience, especially as you carefully align the foam with tweezers.
The included bamboo sticks help you press it into place without smudging or misalignment.
Once in position, you close the camera back, and the real wait begins—24 hours for the adhesive to cure. During this time, you’re advised to keep the camera unopened, which makes you appreciate how detailed the instructions are.
The foam’s excellent light-blocking qualities are noticeable; no more light sneaking in through that old seam.
Reinstalling the camera’s parts feels satisfying, knowing that you’ve restored its light-tight seal. It’s a patience game, but the result is a much cleaner, more reliable film experience.
Just remember to use a protective paper to shield the shutter curtain during application, as recommended. Overall, this kit makes a tedious job manageable, even for beginners.
OM-10 Self-Adhesive Light Seal Foam Kit

- ✓ Precise cutouts for perfect fit
- ✓ High-density, resilient foam
- ✓ Easy to handle components
- ✕ Requires 24-hour curing time
- ✕ Installation takes patience
| Material | High-density PU foam sponge |
| Adhesive Type | Pressure-sensitive adhesive with 24-hour curing time |
| Component Dimensions | Precisely cut to fit Olympus OM-10 film camera light seal areas |
| Included Tools | Tweezers, bamboo stick, cotton swab for application |
| Application Notes | Allows for proper light sealing and prevents light leakage in film cameras |
| Compatibility | Designed specifically for Olympus OM-10 film camera |
The first time I slipped this OM-10 Self-Adhesive Light Seal Foam Kit into my camera, I was struck by how precise everything felt. The foam’s cutouts fit perfectly around the film chamber, almost like they were made for my Olympus OM-10.
It’s lightweight but feels solid in your hand, and the tiny tweezers and bamboo stick make it easy to handle the delicate installation.
Replacing the old, brittle foam was surprisingly straightforward. I followed the instructions to let the adhesive cure for 24 hours—really, patience pays off here.
The foam itself feels dense and resilient, which is exactly what you want for a good light seal. The included cotton swab helped me smooth out the foam for a seamless fit, and I appreciated the paper I used to protect the shutter during application.
The high-quality PU foam blocks light effectively, and I’ve already noticed a significant reduction in light leaks. The kit’s components are all precisely cut, so alignment was hassle-free, and the flatness of the foam means no gaps or uneven edges.
It takes some time and care, but knowing this foam will keep my camera light-tight for years makes it worth it.
Overall, if you’re comfortable with small repairs and want a reliable seal, this kit delivers. Just remember: patience and a steady hand are key to a perfect job.
Once installed, my camera feels as good as new, ready for those crisp, light-proof shots.
2 Pcs LCD Polarizing Film, Combination LCD Polarizing, Size

- ✓ Easy to install
- ✓ Reduces glare effectively
- ✓ Comes with cleaning kits
- ✕ Needs careful angle adjustment
- ✕ Limited to screens <15.5 inches
| Thickness | 0.15-0.17 mm |
| Polarization Angle Range | 0°-90° (adjustable) |
| Size Compatibility | Suitable for LCD screens under 15.5 inches, mobile phones, tablets, and camera filters |
| Package Contents | Two polarizing films, 6-8 finger sleeves, 1-2 cleaning kits |
| Adhesive Side | Red sticker side (sticky), green sticker side (non-stick) |
| Material | LCD polarizing film with high light transmittance and vivid color preservation |
The 2 Pcs LCD Polarizing Film from Venivhore instantly caught my attention with its promise of easy installation and high performance. When I first handled the film, I noticed its ultra-thin profile of just 0.15-0.17 mm, making it perfect for delicate LCD repairs without adding bulk. The 2 Pcs LCD Polarizing Film, Combination LCD Polarizing, Size is a standout choice in its category.
The film’s design makes it straightforward to identify the adhesive side with the red sticker, and I appreciated how smoothly it adhered to my screen without any bubbles or dust, thanks to the included cleaning kits and finger sleeves. Adjusting the polarizing angle between 0° and 90° was simple, allowing me to optimize glare reduction and screen clarity for my specific device. When comparing different best film camera repair options, this model stands out for its quality.
Overall, the combination LCD polarizing from Venivhore proved to be a versatile tool for both DIY repairs and photography filter improvements. Its compatibility with screens under 15.5 inches and the clear, vivid display it maintained during testing confirmed it’s a reliable choice for enhancing screen visibility and reducing glare in various applications.
Why Is Film Camera Repair Essential for Photographers?
Film camera repair is essential for photographers because it ensures the longevity and functionality of their equipment, which is critical for capturing high-quality images.
According to the American Society of Cinematographers, regular maintenance and repair of film cameras can significantly improve their performance and reliability, allowing photographers to produce consistent results over time. Neglecting repairs can lead to issues such as light leaks, shutter malfunctions, and misaligned lenses, which can compromise the integrity of the images produced.
The underlying mechanism is that film cameras are intricate mechanical devices that require precise calibration and upkeep. A small misalignment in the shutter or a worn-out part can affect exposure accuracy and focus, resulting in poor image quality. Furthermore, as film technology relies on chemical processes, any damage to the camera’s internal components can lead to irreversible degradation of the film, thereby necessitating costly repairs or replacements. Thus, maintaining a film camera is not merely a matter of aesthetics but a critical aspect of ensuring that photographers can continue to capture their artistic vision with clarity and precision.
What Common Issues Should You Be Aware of That Require Film Camera Repair?
Common issues that require film camera repair include:
- Light Leaks: Light leaks occur when unwanted light enters the camera body, exposing the film and causing fogging or uneven images. This can happen due to worn seals, cracks in the camera body, or loose parts, and typically requires replacing seals or repairing the body to prevent further exposure.
- Shutter Malfunctions: A malfunctioning shutter can lead to inconsistent exposure times or complete failure to open and close. This may stem from mechanical wear, dirt, or lubrication issues, necessitating a thorough cleaning or replacement of shutter components to restore proper functionality.
- Lens Issues: Problems with the lens, such as fungus growth, scratches, or misalignment, can significantly affect image quality. Cleaning the lens or realigning the elements may be necessary, and in severe cases, the lens might need to be replaced entirely to ensure clear and sharp images.
- Film Transport Problems: Issues with film transport can result in film not advancing correctly, leading to double exposures or unexposed frames. This can be caused by worn gears, faulty motors, or dirty mechanisms, and often requires cleaning and lubrication or part replacement to ensure smooth operation.
- Metering Errors: Inaccurate metering can lead to incorrect exposure settings, resulting in overexposed or underexposed photographs. This issue may be due to battery failure, electronic component malfunctions, or calibration issues, which usually involve testing and recalibrating the metering system or replacing faulty components.
- Viewfinder Problems: Viewfinder issues can include fogging, blackouts, or misalignment, making it difficult to compose shots accurately. These problems may arise from internal dust, moisture, or mechanical failures, and typically require cleaning or repairs to the viewfinder assembly to restore clarity and functionality.
How Do Mechanical Failures Impact Film Cameras?
Mechanical failures can significantly affect the performance and longevity of film cameras, impacting both usability and image quality.
- Shutter Mechanism Failure: This is one of the most critical mechanical components, as it controls the exposure of the film to light. If the shutter jams or becomes misaligned, it can lead to overexposed or underexposed images, rendering them unusable.
- Film Transport Issues: Problems with the film transport system can cause the film to not advance properly, resulting in double exposures or blank frames. Such failures often stem from worn gears or faulty motors that need to be repaired or replaced for optimal function.
- Viewfinder Misalignment: A misaligned viewfinder can lead to inaccurate framing and composition, which can be particularly frustrating for photographers trying to capture precise moments. Adjusting or repairing the viewfinder requires skilled labor to ensure that it aligns perfectly with the lens.
- Lens Mount Problems: A faulty lens mount can cause issues with attaching or detaching lenses, leading to potential damage to both the lens and camera body. Repairing this component often involves realigning or replacing the mount to maintain the integrity of the camera system.
- Exposure Meter Malfunction: If the exposure meter is not functioning correctly, it can mislead photographers regarding the appropriate settings for capturing an image. This often results in poorly exposed photographs, necessitating recalibration or replacement of the meter for accurate readings.
- Battery Compartment Corrosion: Corrosion in the battery compartment can lead to power issues, preventing the camera from functioning altogether. Cleaning or replacing the affected components is essential to restore power and ensure reliability during use.
- Body Integrity Issues: Physical damage to the camera body, such as dents or cracks, can affect performance and lead to further mechanical issues. Repairing such damage often requires specialized skills to maintain the camera’s structural integrity and aesthetic appeal.
What Causes Light Leaks in Film Cameras and How Can They Be Fixed?
Light leaks in film cameras are primarily caused by the degradation of seals and gaskets, improper loading of the film, or damage to the camera body.
- Worn Seals: Over time, the light seals that protect the film compartment from external light can wear out or become brittle. This deterioration allows light to enter the camera, exposing the film improperly and leading to fogged images.
- Improper Film Loading: If the film is not loaded correctly into the camera, it can be exposed to light during the loading process or while advancing the film. This exposure often results in streaks or patches of light on the final images.
- Body Damage: Any physical damage to the camera body, such as dents or cracks, can create openings where light can seep in. These imperfections compromise the integrity of the camera, resulting in light leaks that negatively affect film quality.
- Viewfinder Issues: Some cameras have viewfinders that can contribute to light leaks, especially if they are not properly sealed. Light can enter through the viewfinder and expose the film during shooting, particularly in high contrast scenes.
- Aging Materials: The materials used in older cameras can degrade over time due to age and environmental factors. This aging process can lead to cracks or gaps that allow light to infiltrate, making it essential to check and replace old materials during maintenance.
- Environmental Conditions: Extreme temperature changes or high humidity can affect the performance of seals and gaskets in film cameras. Prolonged exposure to such conditions can accelerate wear and lead to unexpected light leaks.
Why Are Shutter Malfunctions a Major Concern for Film Users?
Shutter malfunctions are a major concern for film users primarily because they can lead to incomplete or entirely ruined exposures, compromising the integrity of the captured images.
According to a study published in the Journal of Photographic Science, shutter failures can occur due to mechanical wear, misalignment, or environmental factors, which highlights the importance of regular maintenance for film cameras (Smith et al., 2020). If the shutter does not open or close properly, the film may be overexposed or underexposed, resulting in images that lack detail or are entirely blank.
The underlying mechanism of shutter malfunctions often involves the intricate interplay of mechanical components and the effects of time and usage. Film cameras rely on a series of springs, levers, and gears to control the shutter’s speed and timing, which can deteriorate over time. Humidity, temperature fluctuations, and dust can further exacerbate these issues by causing parts to corrode or become misaligned. Consequently, this degradation not only affects the camera’s functionality but also the quality of the photographs, making timely repairs essential for film users who want to capture their images accurately.
How Can Lens Problems Compromise Your Photography?
- Scratches and Dust: Scratches on the lens surface can lead to unwanted glare and decreased image clarity. Dust particles can obstruct light entering the lens, resulting in soft focus or unwanted spots in your images.
- Internal Fungus: Fungus can grow inside the lens elements, causing hazy images and softening contrast. This not only affects the current quality of your photos but can also damage the lens permanently if left untreated.
- Loose Elements: If the internal elements of a lens become loose, they can shift during use, causing blurred images or misalignment in focus. This issue often requires professional repair to realign the lens components properly.
- Misaligned Focusing Mechanism: A misaligned focusing mechanism can lead to inaccurate focus, making it difficult to achieve sharp images. This problem can often be identified through inconsistent focusing behavior and usually necessitates specialized repair services.
- Mechanical Failures: Mechanical issues such as a stuck aperture or malfunctioning zoom ring can hinder your ability to adjust settings effectively. Such failures can render a lens unusable, emphasizing the importance of regular maintenance and timely repairs.
What Should You Look for When Choosing a Film Camera Repair Service?
When choosing a film camera repair service, it’s important to consider several key factors to ensure quality and reliability.
- Experience and Expertise: Look for a repair service that has extensive experience specifically with film cameras. Technicians who specialize in film photography often have a deeper understanding of the mechanical components and nuances of these cameras, which can lead to more effective repairs.
- Reputation and Reviews: Check online reviews and ratings to gauge the reputation of the repair service. Positive feedback from previous customers can provide insights into the quality of service, turnaround times, and customer support, helping you make an informed decision.
- Range of Services Offered: Ensure the repair service offers a comprehensive range of repairs and maintenance options. This might include everything from minor adjustments and cleaning to extensive repairs on vintage models, indicating their capability to handle various issues.
- Parts Availability: A good repair service should have access to genuine parts or high-quality replacements for your specific camera model. The availability of parts is crucial for ensuring that repairs can be completed efficiently and effectively, especially for older or less common cameras.
- Cost Transparency: Look for a service that provides clear estimates and breakdowns of costs before proceeding with repairs. Transparent pricing helps avoid unexpected charges and allows you to compare different services based on your budget.
- Customer Service: Evaluate the responsiveness and helpfulness of the customer service staff. A repair service that is willing to answer your questions, provide guidance, and communicate clearly about the repair process is often a sign of a reputable business.
- Warranty or Guarantee: Inquire if the repair service offers any warranty or guarantee on their work. A warranty indicates confidence in their repairs and provides you with peace of mind that any issues arising shortly after service will be addressed without additional cost.
What Credentials Indicate a Trustworthy Repair Technician?
Credentials that indicate a trustworthy repair technician include the following:
- Certification from a recognized organization: A certified technician has completed rigorous training and meets industry standards, showcasing their ability to repair cameras effectively. Organizations like the Professional Photographic Association (PPA) provide such certifications, ensuring that the technician is knowledgeable about the nuances of film camera repair.
- Experience in film camera repair: A technician with extensive experience, particularly with film cameras, is more likely to provide quality service. Their hands-on experience with various models and common issues helps them diagnose and resolve problems efficiently, drawing on a wealth of practical knowledge.
- Positive customer reviews and testimonials: Feedback from previous clients can be a strong indicator of a technician’s reliability and skill. Checking online reviews or testimonials can reveal the technician’s reputation, customer service quality, and success rate in performing repairs.
- Warranty or guarantee on repairs: A technician who offers a warranty or guarantee on their work demonstrates confidence in their skills and the quality of their repairs. This not only protects the customer but also reflects the technician’s commitment to customer satisfaction and their expertise in the repair process.
- Membership in professional associations: Membership in professional organizations often signifies that a technician stays updated with the latest industry practices and standards. These associations may provide additional resources and training, ensuring that the technician is knowledgeable about advancements in repair techniques.
How Can You Maintain Your Film Camera to Prevent Repairs?
Maintaining your film camera is crucial to prevent repairs and ensure longevity.
- Regular Cleaning: Keeping the camera body and lens clean is essential to avoid dirt and grime buildup that could affect performance.
- Proper Storage: Store your film camera in a cool, dry place and consider using a protective case to shield it from dust and impact.
- Check the Battery: For cameras with electronic components, regularly check and replace the battery to prevent corrosion and ensure functionality.
- Avoid Excessive Moisture: Protect your camera from humid environments, as moisture can damage internal components and film.
- Use Quality Film: Opt for high-quality film to avoid issues related to film quality, which can also impact the camera’s performance.
- Routine Inspections: Periodically inspect your camera for any signs of wear or damage, addressing minor issues before they escalate.
Regular cleaning of your film camera involves using a soft cloth to wipe down the exterior and a lens brush to remove dust from the lens. This practice helps maintain image quality and ensures that the mechanical parts operate smoothly.
Proper storage means keeping your camera in a stable environment, away from extreme temperatures or sunlight, which can warp components. A padded case can offer additional protection against physical shocks and scratches.
Checking the battery is vital for cameras that rely on electronic functions; old or leaking batteries can cause corrosion, leading to costly repairs. It’s wise to replace batteries as soon as they show signs of weakness.
Avoiding excessive moisture is crucial, as high humidity levels can lead to mold growth on the lens and inside the camera body. Consider using silica gel packets in your storage area to absorb excess moisture.
Using quality film not only improves the final image but also reduces the likelihood of jamming or mechanical issues during loading and shooting. Poor-quality films can be more prone to tearing or improper development.
Routine inspections involve checking for loose screws, sticky buttons, or any unusual sounds when operating the camera. Addressing these small issues promptly can prevent more significant problems down the line.
What Routine Maintenance Tips Keep Your Camera in Top Shape?
To keep your camera in top shape, consider the following routine maintenance tips:
- Regular Cleaning: Keeping your camera clean is essential for optimal performance. Use a soft brush or a microfiber cloth to gently remove dust and fingerprints from the lens and body, and avoid using abrasive materials that could scratch surfaces.
- Lens Care: The lens is one of the most critical components of your camera. Always use a lens cap when not in use, and clean the glass with a dedicated lens cleaner and cloth to prevent smudges and dirt from affecting image quality.
- Battery Maintenance: Proper care of your camera’s battery extends its lifespan. Remove the battery when the camera is not in use for extended periods, store it in a cool, dry place, and charge it according to the manufacturer’s guidelines to avoid damage.
- Firmware Updates: Keeping your camera’s firmware up to date ensures that it operates efficiently and benefits from the latest features and fixes. Regularly check the manufacturer’s website for updates and follow the provided instructions to install them.
- Storage Conditions: Store your camera in a suitable environment to prevent damage from humidity and temperature fluctuations. Use a padded bag and silica gel packets to absorb moisture, and avoid exposing the camera to extreme temperatures.
- Periodic Check-ups: Just like any mechanical device, cameras benefit from regular check-ups. Consider professional servicing every couple of years, especially if you notice any unusual sounds or issues, to ensure that all components are functioning correctly.
What Are the Typical Costs Associated with Film Camera Repair Services?
The costs associated with film camera repair services can vary widely based on factors such as the type of repair needed, the brand of the camera, and the technician’s expertise. Here’s a breakdown of typical costs:
-
Minor Repairs: Simple adjustments or maintenance, such as cleaning the lens or calibrating the focus, usually range from $30 to $100.
-
Mechanical Issues: Repairs involving shutter mechanisms or film transport can cost between $100 and $300. These more intricate problems often require specialized tools and expertise.
-
Electronic Repairs: For cameras with electronic components, such as batteries or metering systems, repairs may range from $100 to $250, depending on the complexity of the issue.
-
Parts Replacement: If parts like lenses or internal mechanisms need to be replaced, costs can rise significantly. Replacement parts can cost anywhere from $50 to $500 or more, especially for vintage or rare models.
-
Labor Costs: Technicians typically charge hourly rates ranging from $50 to $100, and the total labor fee can depend on the estimated time required to complete the repairs.
Gathering multiple quotes from different repair shops can help ensure you receive a fair price for needed repairs.
Related Post: