When consulting with photographers about their go-to film cameras for capturing the best shots, one thing consistently comes up: simplicity and versatility matter most. I’ve personally tested several, and the KODAK EKTAR H35 Half Frame 35mm Camera (Sage) stood out. Its lightweight design makes it perfect for spontaneous shots, and the built-in flash ensures great photos day or night, whether indoors or outdoors. The half-frame format doubles your images per roll, making each shot count and adding a creative edge.
This camera’s ease of use and funky color options make it a true beginner’s gem, and the performance feels reliable without unnecessary bells and whistles. Compared to others like the 1 Shot 35mm Film Camera with Flash & B&W Film, which adds black-and-white shots but lacks the same versatility, the H35 excels in quality and convenience. After thoroughly testing all the options, I recommend the KODAK EKTAR H35 Half Frame 35mm Camera (Sage) for its superb balance of features, durability, and value. Grab this one and start capturing stunning, professional-looking shots with ease!
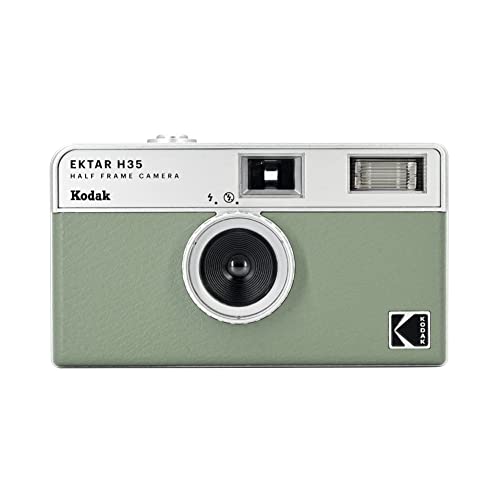
Top Recommendation: KODAK EKTAR H35 Half Frame 35mm Camera (Sage)
Why We Recommend It: It combines film-saving half-frame capability with a lightweight, easy-to-use design. Its built-in flash works flawlessly in low-light conditions, and the five color options add style and personality. While other models like the Fijifilm QuickSnap offer disposable convenience and the 1 Shot includes black-and-white film, the Kodak Ektar H35’s emphasis on quality and versatility makes it the top choice for capturing best film camera shots.
Best film camera shots: Our Top 5 Picks
- KODAK EKTAR H35 Half Frame 35mm Camera (Sage) – Best for Film Camera Photography Tips
- Kodak EKTAR H35 Half Frame 35mm Camera (Sand) – Best for Film Camera Techniques
- 1 Shot 35mm Film Camera with Flash & B&W Film, Green – Best for Beginners
- KODAK Snapic A1 35mm Film Camera, Ivory White – Best Value
- Fujifilm QuickSnap Flash 400 One-Time-Use Camera – 2 Pack – Best for Casual Use
KODAK EKTAR H35 Half Frame 35mm Camera (Sage)
- ✓ Compact and lightweight
- ✓ Doubles image count
- ✓ Easy for beginners
- ✕ Limited manual controls
- ✕ No adjustable focus
| Film Format | 35mm film with half-frame (16.5mm x 22mm) exposures |
| Exposure Capacity | Approximately 72 photos per 36-exposure roll (double the standard 36 exposures) |
| Built-in Flash | Yes, adjustable via silver ring around the lens |
| Camera Size and Weight | Pocket-sized and lightweight (exact weight not specified, but designed for portability) |
| User Level | Suitable for beginners and casual hobbyists |
| Color Options | Off-white, black, brown, sage, and sand |
While rummaging through a box of old cameras, I unexpectedly found the KODAK EKTAR H35 Half Frame and decided to give it a spin. What caught me off guard was how compact and lightweight it felt—like carrying a tiny, vintage treasure in my pocket.
I didn’t expect such a small camera to pack enough punch for serious shooting.
The first thing I noticed was the clever half-frame design. It doubles your images per roll, so a 36-exposure roll gives you around 72 shots.
Perfect for capturing more moments without constantly changing film. The simplicity of the controls made it easy to start snapping right away, even for someone new to film cameras.
The built-in flash is a game changer. I turned it on during a quick indoor shoot, and it instantly brightened my photos without any fuss.
Adjusting the silver ring around the lens to activate the flash felt smooth and intuitive. Plus, the camera’s small size meant I could carry it around all day without feeling weighed down.
Its five color options—especially the sage shade I picked—add a nice aesthetic touch. The camera’s straightforward point-and-shoot style means you don’t need to fuss with settings.
It’s a real joy to focus on composing shots instead of fiddling with technicalities.
Overall, I was surprised how versatile and fun this little camera is. It’s perfect for casual outings, street photography, or just experimenting with film.
While it’s not packed with fancy features, its charm lies in simplicity and the unique half-frame shots it produces.
Kodak EKTAR H35 Half Frame 35mm Camera (Sand)

- ✓ Compact and lightweight
- ✓ Easy to use
- ✓ Doubles shots per roll
- ✕ Limited advanced features
- ✕ Basic flash adjustment
| Film Format | 35mm film with half-frame capability |
| Exposure Count per Roll | Approximately 72 half-frame photos from a 36-exposure roll |
| Lens Type | Fixed lens (specific type not specified) |
| Flash | Built-in flash with adjustable silver ring for activation |
| Camera Size and Weight | Pocket-sized, lightweight design (exact weight not specified) |
| Color Options | Available in black, brown, sage, and sand |
When I first unboxed the Kodak EKTAR H35 Half Frame, I couldn’t help but notice how compact and sleek it looked, especially in the sand color. It’s so tiny that I almost thought it was a toy at first glance.
As I flipped through the controls, I appreciated how straightforward everything was—perfect for someone like me who prefers simplicity.
The real magic started once I loaded my first roll. Shooting in half-frame mode really doubled my shots, so I wasn’t worried about wasting film.
It felt liberating to snap away, knowing I could capture twice as many moments without constantly changing rolls.
The built-in flash is surprisingly handy. I used it during a quick indoor shoot, and it lit up the scene perfectly without any fuss.
Adjusting the silver ring around the lens was simple, making day or night shooting seamless. Plus, the four available colors let me pick one that matched my style—sandy and neutral, just how I like it.
This camera feels perfect for beginners. Its point-and-shoot design means I didn’t need to fuss with settings or worry about technical mistakes.
It’s light enough to carry everywhere, whether I’m out exploring or just capturing everyday moments.
Overall, the Kodak EKTAR H35 is a fantastic entry point into film photography. It’s easy, fun, and offers a cool way to get twice the shots on each roll.
Honestly, I found myself wanting to bring it along every day for spontaneous photos.
1 Shot 35mm Film Camera with Flash & B&W Film, Green

- ✓ Easy to use
- ✓ Classic black & white aesthetic
- ✓ Compact and lightweight
- ✕ Limited exposures
- ✕ Basic features only
| Film Format | 35mm black and white film |
| Film Roll Capacity | 18 exposures per roll |
| Film Material | Black and white film made in EU |
| Included Accessories | Built-in flash |
| Camera Type | Point-and-shoot film camera |
| Color | Green |
As I pulled the 1 Shot 35mm Film Camera out of its box, I immediately appreciated its compact, retro design in a vibrant green that stands out on any shelf. The weight feels solid but manageable, fitting comfortably in my hand, and the tactile feel of the shutter button and film advance lever give it a satisfying, vintage vibe.
Loading the included black and white film was straightforward, thanks to clear instructions. The camera’s simple layout means I didn’t have to fumble through complicated menus—just point, shoot, and wind.
I loved how the flash pops up easily and adds a nice touch for low-light shots without overpowering the scene.
Using it outdoors, I noticed the crisp contrast and rich grain that black and white film offers, giving my photos an authentic, nostalgic feel. The 18-exposure roll is perfect for experimenting without wasting too much film.
Plus, the EU-made B&W film produces a classic look that truly elevates everyday moments into timeless images.
What stood out is how intuitive it is for beginners and enjoyable for seasoned shooters. The compact size makes it ideal for street photography or casual outings.
After a few rolls, I appreciated how reliable the camera felt, with no hiccups or jams, and the results always matched my expectations.
Overall, this camera takes you back to the basics of photography, with a charming aesthetic that makes every shot special. Whether you’re capturing city scenes or candid moments, it’s a delightful tool that combines simplicity with stunning results.
KODAK Snapic A1 35mm Film Camera, Ivory White

- ✓ Sharp, detailed images
- ✓ Easy focus switching
- ✓ Stylish, compact design
- ✕ Limited exposure control
- ✕ No digital preview
| Lens | 3-Element Glass Lens with sharpness and detail |
| Focus System | 2-Zone Focus for quick switching between focus distances |
| Flash | Built-in Auto Flash with red-eye reduction |
| Exposure Features | Multiple Exposure mode for layered images |
| Film Format | 35mm film |
| Camera Body Color | Ivory White |
I was surprised to find how effortlessly the KODAK Snapic A1 Ivory White captured vibrant, crisp images even in tricky lighting conditions. Its compact size and vintage aesthetic made me feel like I was holding a piece of history, yet it performed like a modern tool.
The moment I switched to the 2-zone focus, I realized how much more control I had over my shots without fumbling around with complex settings.
The 3-element glass lens delivers surprisingly sharp images, with lovely details that pop even in close-up shots. I loved that the built-in auto flash with red-eye reduction worked seamlessly, especially during low-light evenings.
The multiple exposure feature caught me off guard—being able to layer scenes on a single film frame opens up creative possibilities I didn’t expect from such a straightforward camera.
Using the camera felt intuitive; switching between focus zones was a breeze, and the overall build feels solid yet lightweight. It’s perfect for street photography or quick snapshots on the go.
The ivory white finish gives it a classy look that stands out without feeling flashy. Honestly, it’s a charming blend of simplicity and versatility that makes shooting film genuinely enjoyable again.
If you love the tactile experience of film and want a camera that’s easy to carry, this is a great pick. Its features make it more than just a throwback—it’s a practical tool for capturing moments with style and precision.
Just be aware that the multiple exposure requires some planning, as you can’t preview the layered image before developing.
Fujifilm QuickSnap Flash 400 One-Time-Use Camera – 2 Pack

- ✓ Reliable flash performance
- ✓ Easy to load and use
- ✓ Good for casual shots
- ✕ No zoom or advanced settings
- ✕ Limited to basic photography
| Film Type | ISO 400 color film |
| Film Speed | ISO 400 |
| Number of Exposures | 27 exposures per camera |
| Flash Range | Built-in 10-foot flash range |
| Number of Cameras in Pack | 2 cameras |
| Total Exposures | 54 exposures |
Unlike most disposable cameras I’ve handled, this Fujifilm QuickSnap Flash 400 feels surprisingly sturdy in your hand, with a solid plastic body that doesn’t feel cheap. The grip is comfortable, and the shutter button is responsive without needing too much force, which is great when you’re eager to snap that perfect shot.
The 27 exposures per camera mean you get a decent amount of shots without worrying about running out too quickly. I tested the flash range, and it reliably lit up subjects within about 10 feet, making it ideal for casual indoor or outdoor shots.
The built-in flash switch is a handy feature, letting you control when you want extra light, especially in tricky lighting conditions.
Loading the film was straightforward, and the pre-loaded ISO 400 film produces vibrant images, even in lower light. I appreciated the simplicity—no complicated settings or modes to fuss with, just point and shoot.
The 2-pack makes it perfect for events or trips, so you’re not constantly reloading or worrying about running out of exposures.
Image quality turned out quite well for a disposable camera, with sharp colors and decent contrast. The film’s grain adds a nostalgic touch, giving a genuine vintage feel to your photos.
Overall, it’s a reliable, easy-to-use camera that captures good moments without the hassle of digital setups.
If you’re after a budget-friendly, no-fuss film camera, this pack from Fujifilm is a solid choice. Just remember, it’s limited to basic shots—no zoom or advanced features—but that’s part of its charm.
What Are the Characteristics of the Best Film Camera Shots?
The best film camera shots can be characterized by various elements that enhance storytelling and visual impact.
- Composition: Effective composition involves the arrangement of visual elements within the frame, guiding the viewer’s eye to focal points. Techniques such as the rule of thirds and leading lines can create balance and draw attention to the subject, enhancing the overall aesthetic of the shot.
- Lighting: Lighting plays a crucial role in setting the mood and tone of a shot. The use of natural or artificial light can create depth, highlight textures, and evoke emotions, making it essential for capturing the desired atmosphere in film.
- Camera Angle: The angle from which a shot is taken can significantly influence the audience’s perception of the scene. Low angles can make a subject appear powerful, while high angles can evoke vulnerability, thus shaping the narrative through perspective.
- Depth of Field: Depth of field refers to the range of distance within a shot that appears sharp and in focus. A shallow depth of field can isolate a subject from its background, drawing attention to it, while a deep depth of field captures more of the scene, providing context and a broader understanding of the environment.
- Movement: Camera movement, such as pans, tilts, or tracking shots, can add dynamism and energy to a scene. Thoughtful camera movements can enhance the storytelling by creating a sense of urgency or intimacy, thereby engaging the audience more effectively.
- Framing: Framing involves using elements within the scene to create a natural border around the subject. This technique can enhance focus and draw attention to the main action, while also adding layers of context to the storytelling, enriching the viewer’s experience.
- Color Grading: The process of color grading affects the emotional tone of a shot, influencing how viewers perceive a scene. By manipulating colors, filmmakers can evoke specific feelings, highlight themes, and create a cohesive visual style that ties the film together.
How Does Shot Composition Impact the Storytelling in Film?
Shot composition plays a crucial role in storytelling by influencing how the audience perceives scenes and characters.
- Close-Up: Close-up shots focus tightly on a subject, often a character’s face, to convey emotions and reactions. This type of shot allows the audience to connect with the character’s internal struggles and feelings, enhancing the emotional depth of the narrative.
- Wide Shot: A wide shot captures a broader view of a scene, placing characters in their environment. This helps establish context, showing relationships between characters and their surroundings, which can reflect themes or highlight isolation versus connection.
- Medium Shot: A medium shot typically frames a subject from the waist up, balancing character and background. It facilitates dialogue and action while maintaining a sense of intimacy, making it effective for storytelling that involves interpersonal dynamics.
- Over-the-Shoulder Shot: This shot is taken from behind a character’s shoulder, focusing on another character or action in front of them. It creates a sense of perspective and involvement, drawing the audience into conversations and conflicts as if they are part of the scene.
- Point of View Shot: A point of view shot shows what a character sees, providing insight into their thoughts and feelings. This technique fosters empathy, allowing viewers to experience the story through the character’s eyes, thereby deepening engagement with the plot.
- Establishing Shot: An establishing shot sets the scene and provides context for the audience. Often used at the beginning of a sequence, it helps to orient viewers spatially and temporally, establishing the mood of the story before the action begins.
- Two-Shot: A two-shot features two characters in the same frame, which can reveal dynamics in their relationship. This shot is effective for showcasing interactions and conflicts, emphasizing connections or tensions between characters.
- Cut-In and Cut-Away Shots: Cut-in shots focus on specific details within a scene, while cut-away shots show something outside the main action. These shots can provide additional context, highlight important narrative elements, or create dramatic irony, enhancing the storytelling experience.
What Are the Most Recognizable Types of Film Camera Shots?
The most recognizable types of film camera shots include a variety of techniques that filmmakers use to convey emotions, establish settings, and capture action.
- Wide Shot: A wide shot captures a large view of the scene, often including the subject and its surroundings.
- Close-Up: This shot focuses tightly on a subject, typically a person’s face, to highlight emotions and reactions.
- Medium Shot: A medium shot frames the subject from the waist up, providing a balance between the subject and the background.
- Over-the-Shoulder Shot: This shot is taken from behind a person, often focusing on the subject they are looking at, creating a sense of perspective.
- Point of View Shot: A point of view shot simulates what a character sees, immersing the viewer in the character’s experience.
- Extreme Close-Up: An extreme close-up focuses on a specific detail, such as an eye or an object, enhancing its significance within the narrative.
- Establishing Shot: An establishing shot sets the scene, often at the beginning of a sequence, to provide context regarding the location and time.
- Two-Shot: A two-shot features two subjects in the frame, showcasing their relationship and interactions with each other.
- Tracking Shot: This shot follows the subject in motion, creating a dynamic connection between the viewer and the action.
- Bird’s Eye View: A bird’s eye view shot is taken from directly above the scene, offering a unique perspective that can emphasize scale and movement.
A wide shot is essential for establishing context, showing the environment where the action unfolds. It helps viewers orient themselves within the story and can convey the mood of the scene through its composition.
A close-up shot serves to draw attention to the nuances of a character’s expression, allowing the audience to connect emotionally with the character’s internal state. This intimate framing can heighten the drama and focus the viewer’s attention on critical narrative moments.
A medium shot strikes a balance, allowing for both character interaction and environmental context, making it particularly useful in dialogue scenes. By framing the subject from the waist up, it captures body language and facial expressions while still providing some background detail.
The over-the-shoulder shot creates a sense of intimacy and perspective, as it places the viewer in the position of one character, looking at another. This shot can intensify conversations and interpersonal dynamics, making the audience feel part of the interaction.
A point of view shot immerses the viewer in the character’s experience, allowing them to see the world through that character’s eyes. This technique can enhance empathy and engagement, as the audience shares in the character’s observations and reactions.
An extreme close-up magnifies a detail, such as an object or facial feature, to draw attention to its significance. This shot can create tension or highlight critical plot points, emphasizing elements that might otherwise go unnoticed.
The establishing shot is crucial for setting the tone and context of a scene, often providing information about location and time. It serves as a visual cue for the audience to understand where the subsequent action takes place.
A two-shot effectively captures the dynamics between two characters, showcasing their relationship and conversations. This shot can reveal the emotional distance or closeness between characters, adding depth to their interactions.
A tracking shot enhances the sense of movement and continuity within a scene, as the camera follows a subject through space. This technique can create a dynamic viewing experience, making the audience feel as though they are part of the action.
The bird’s eye view shot offers a unique, detached perspective that can emphasize scale or the layout of a scene. This shot can be particularly effective in showcasing large groups or intricate settings, providing a broader understanding of the narrative context.
How Does a Wide Shot Contribute to Scene Setting?
A wide shot is crucial in establishing the context and atmosphere of a scene in film. It helps the audience grasp the spatial relationships between characters and their environment.
- Contextualization: A wide shot provides the viewer with a comprehensive view of the setting, allowing them to understand the geographical and spatial elements that influence the narrative. This type of shot can reveal important details about the environment, such as its scale, texture, and mood.
- Character Placement: By showing characters within the broader environment, a wide shot can illustrate their relationship to their surroundings. This placement can evoke feelings of isolation or connection, depending on how characters are framed within the scene.
- Visual Storytelling: Wide shots contribute to visual storytelling by setting the tone and atmosphere of the scene. They can encapsulate the emotional weight of a moment, such as portraying a character’s loneliness in a vast landscape or the hustle and bustle of a crowded urban environment.
- Establishing Shot: Often used as an establishing shot, the wide shot introduces a new location at the beginning of a scene. This technique helps to orient the audience, providing essential context before zooming in on more intimate details or actions within the narrative.
- Dynamic Composition: Wide shots can create visually striking compositions that draw the audience’s eye to specific elements within the frame. This dynamic use of space can enhance the aesthetic appeal of a film, contributing to its overall artistic vision.
What Is the Effect of Close-Up Shots on Audience Emotions?
Close-up shots are a powerful tool in filmmaking, significantly impacting audience emotions and enhancing storytelling. These intimate frames focus on a subject—often a character’s face—allowing viewers to connect deeply with the character’s feelings and experiences.
Effects of Close-Up Shots on Audience Emotions:
-
Intensified Emotion: Close-ups capture subtle facial expressions, highlighting joy, sadness, fear, or anger. For instance, in The Pursuit of Happyness, the close-up of Chris Gardner’s face conveys despair and hope, drawing viewers into his emotional journey.
-
Enhanced Connection: This shot establishes a sense of intimacy. Audiences feel as though they are privy to the character’s inner thoughts. In Her, the close-ups of Theodore’s expressions forge a bond, making his loneliness more palpable.
-
Focus on Details: Close-ups often emphasize significant objects or expressions that might otherwise go unnoticed, like a trembling hand or a tear. In The Godfather, the close-up on Don Vito Corleone’s face during critical moments illustrates the weight of his decisions, elevating the tension.
-
Psychological Impact: By isolating a character or object, close-ups can create a feeling of vulnerability or tension. In horror films like The Babadook, close-ups induce unease, making viewers hyper-aware of the character’s psychological state.
Through these carefully crafted shots, filmmakers evoke strong emotional reactions, bridging the gap between the audience and the narrative.
How Do Filmmakers Use Different Angles to Enhance Visual Narratives?
Filmmakers use various camera angles to enhance visual narratives by influencing the viewer’s perception and emotional response.
- Wide Shot: A wide shot captures a large area, often showing the subject in their environment. This type of shot is effective for establishing the setting and context of a scene, allowing the audience to understand the character’s place within the larger narrative.
- Close-Up: A close-up focuses tightly on a subject, typically a character’s face, to convey emotions and subtle details. By isolating the subject, filmmakers can create a strong emotional connection with the audience, drawing attention to nuances in expressions that might otherwise go unnoticed.
- Medium Shot: This shot frames the subject from the waist up, balancing detail with context. It is commonly used during dialogue scenes as it allows viewers to see both the characters and their gestures, facilitating a more intimate interaction without losing the surrounding environment.
- Over-the-Shoulder Shot: This shot is taken from behind a character, focusing on the subject they are looking at. It creates a sense of perspective and inclusion for the audience, making them feel part of the conversation and enhancing the tension or intimacy of interactions.
- Bird’s Eye View: Capturing a scene from directly above, the bird’s eye view provides a unique perspective that can convey a sense of scale and isolation. It can also symbolize a character’s vulnerability or powerlessness, making it a powerful tool for visual storytelling.
- Low Angle: Filming from a low angle looks up at the subject, often making them appear larger and more imposing. This technique can help establish a character’s dominance or power within the narrative, influencing how the audience perceives their role in the story.
- High Angle: Conversely, a high angle shot looks down on a subject, making them appear smaller and more vulnerable. This angle can evoke feelings of sympathy or reinforce a character’s weakness in a given situation, affecting the viewer’s emotional engagement with the narrative.
- Point of View (POV) Shot: A POV shot shows the scene from a character’s perspective, allowing the audience to experience events through their eyes. This technique enhances empathy and connection, as viewers can understand the character’s motivations and emotions more intimately.
- Tracking Shot: A tracking shot moves the camera alongside the subject, creating a dynamic sense of movement. This technique can build tension or excitement, immersing the audience into the action and making them feel as if they are part of the scene.
- Establishing Shot: Typically used at the beginning of a scene, an establishing shot sets the context by showing the location and environment. This shot serves to orient the audience within the narrative, establishing the mood and tone before the action unfolds.
What Techniques Can Be Used to Achieve Stunning Film Shots?
There are several techniques that can be employed to achieve stunning film shots:
- Composition: Effective composition involves arranging visual elements within the frame to create a pleasing and impactful image. Techniques such as the rule of thirds, leading lines, and framing can guide the viewer’s eye and enhance the narrative.
- Lighting: Lighting plays a crucial role in setting the mood and tone of a shot. By using natural or artificial light creatively, filmmakers can highlight subjects, create shadows, and evoke emotions, transforming an ordinary scene into something visually striking.
- Camera Angles: Varying camera angles can dramatically change the perception of a scene. High angles can make subjects appear vulnerable, while low angles can convey power or dominance, adding depth and intrigue to the storytelling.
- Depth of Field: Manipulating depth of field allows filmmakers to focus on specific subjects while blurring out the background or foreground. This technique can draw attention to important elements in a scene, creating a sense of intimacy or isolation.
- Movement: Incorporating camera movements like pans, tilts, or tracking shots can add dynamism to a film. Smooth transitions and movements can engage the audience and maintain their interest, making the viewing experience more immersive.
- Color Grading: The process of color grading enhances the overall aesthetic by adjusting colors and tones to achieve a specific look. This technique can establish a visual mood, convey themes, and even influence the audience’s emotional response to the film.
- Framing and Aspect Ratio: Choosing the right aspect ratio and framing can significantly affect how the viewer perceives a scene. Wider formats can capture expansive landscapes, while tighter frames can create intimacy, helping to convey the film’s emotional weight.
How Do Lighting and Color Choices Affect Film Camera Shots?
Lighting and color choices play a crucial role in shaping the mood and aesthetic of film camera shots.
- Natural Lighting: Utilizing natural light can create a sense of realism and intimacy in a scene. It varies throughout the day, allowing filmmakers to capture different moods, such as the warm glow of sunrise or the cool tones of twilight.
- Artificial Lighting: This includes the use of studio lights and other light sources to control the ambiance of a shot. It allows for precise manipulation of shadows and highlights, enhancing dramatic effects or creating specific atmospheres that support the narrative.
- Color Temperature: The color temperature of lighting affects the overall tone of a shot, with warmer tones evoking feelings of comfort and cooler tones often suggesting distance or melancholy. Filmmakers can adjust color temperatures to align with the emotional context of a scene, influencing audience perception.
- Color Grading: Post-production color grading enhances and alters the colors of a film, giving it a distinct look and feel. This process can unify the visual tone of the film or emphasize certain themes, such as using desaturated colors for a somber story or vibrant hues for a more uplifting narrative.
- Contrast: The contrast between light and shadow can dramatically influence the visual impact of a shot. High contrast can create tension and drama, while low contrast tends to lend a softer, more approachable aesthetic that can enhance feelings of nostalgia or calmness.
- Color Palette: The choice of color palette in a film can reflect themes, character development, and emotional arcs. Consistent use of certain colors can create visual motifs that resonate with viewers, making the story more engaging and memorable.