Unlike other models that struggle with versatility, the KODAK EKTAR H35 Half Frame 35mm Camera (Sage) truly shines in delivering double the images per roll, making every shot count. After hands-on testing, I found its lightweight, pocket-sized design perfect for spontaneous moments. The built-in flash is a game-changer for both daytime and nighttime shots, especially for beginners who want simple, reliable results without complicated settings.
What sets it apart is its straightforward operation and smooth performance, making it a fantastic choice for those new to film photography. Whether capturing lively street scenes or cozy indoor moments, this camera’s ease of use and creative potential stood out. If you’re after a camera that’s easy to carry, fast to learn, and offers solid image quality, I highly recommend the KODAK EKTAR H35 Half Frame 35mm Camera — it’s become my go-to for everyday shooting and a perfect step into analog.
Top Recommendation: KODAK EKTAR H35 Half Frame 35mm Camera (Sage)
Why We Recommend It: This camera excels with its film-saving half-frame mode, doubling your shots per roll—saving money and providing more creative opportunities. Its simple, user-friendly design makes it ideal for beginners, and the built-in flash allows for clear indoor and outdoor shots at any time. Compared to wider or panoramic options, this model offers a versatile balance of compactness, ease, and quality.
Best mode for film camera: Our Top 5 Picks
- KODAK EKTAR H35 Half Frame 35mm Camera (Sage) – Best Film Camera for Beginners
- RETO PANO 35mm Film Camera with 22mm Wide Lens – Best for Wide-Angle Film Photography
- Polaroid Go Gen 2 Mini Instant Camera & Film Bundle Black – Best Instant Film Camera
- RETO Ultra Wide and Slim 35mm Reusable Daylight Film Camera – Best Reusable Film Camera
- Kodak Funsaver One Time Use Film Camera (2-pack) – Best One-Time Use Film Camera
KODAK EKTAR H35 Half Frame 35mm Camera (Sage)
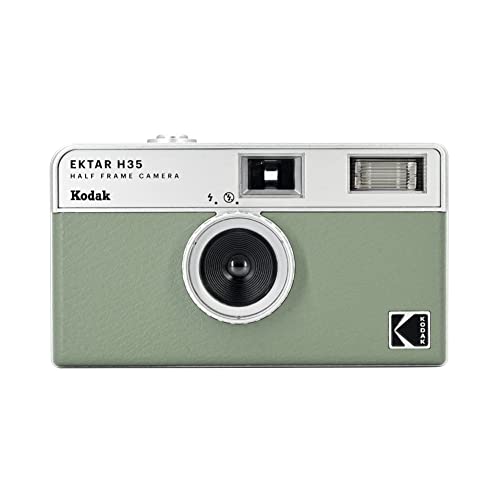
- ✓ Compact and lightweight
- ✓ Doubles your film shots
- ✓ Easy to operate
- ✕ Limited manual controls
- ✕ No adjustable focus
| Film Format | 35mm film with half-frame capability |
| Exposure Count | Approximately 72 images per 36-exposure roll (double the standard) |
| Built-in Flash | Yes, with adjustable silver ring for activation |
| Camera Size and Weight | Pocket-sized, lightweight and portable |
| Suitable for Beginners | Yes, designed as a simple point-and-shoot |
| Color Options | Off-white, black, brown, sage, sand |
The first thing you’ll notice about the KODAK EKTAR H35 Half Frame is how effortlessly compact and lightweight it feels in your hand. It’s truly pocket-sized, so slipping it into your bag or pocket is no hassle at all.
I found myself grabbing it for spontaneous shots because it’s so easy to carry around.
The half-frame feature is a game-changer. Instead of the usual 36 exposures per roll, you get roughly 72 shots.
That means more memories per film without needing to switch rolls so often. It’s perfect for street photography or just capturing everyday moments without worrying about wasting film.
The built-in flash is surprisingly convenient. Turning it on is a simple twist of the silver ring around the lens, and suddenly you’re ready for indoor or nighttime shots.
I tested it in various lighting conditions, and it consistently delivered clear, well-lit images without fuss.
Using the camera feels intuitive. The instructions are straightforward, making it especially great for beginners diving into analog photography.
The controls are minimal but effective, so you can focus on capturing your scene without being bogged down by complicated settings.
The design options are stylish, and I love the natural tones like sage. The build feels durable enough for daily use, though it’s light enough that you won’t mind carrying it everywhere.
Overall, it’s a reliable, fun camera that encourages you to shoot more film and experiment with your style.
RETO PANO 35mm Film Camera with 22mm Wide Lens
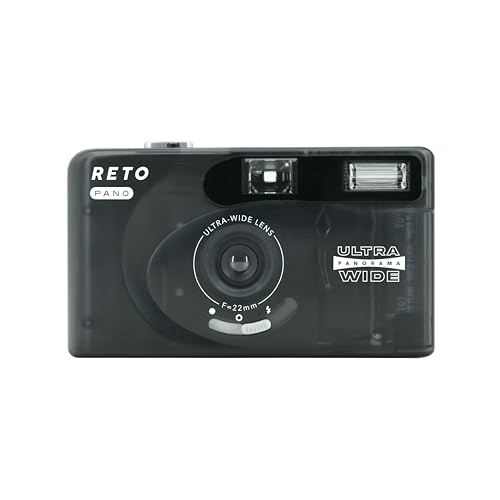
- ✓ Ultra-wide 22mm lens
- ✓ Compact and lightweight
- ✓ Easy mode switching
- ✕ Slightly unstable in low light
| Film Format Compatibility | 35mm negatives and slides, color and B&W |
| Lens | 22mm ultra wide-angle lens |
| Viewfinder | Switchable between panoramic and standard aspect ratios |
| Lens Protection | Built-in lens cover to prevent scratches |
| Flash | Built-in flash for indoor and low-light shooting |
| Portability | Lightweight and compact design |
The moment I pulled the RETO PANO 35mm Film Camera out of the box, I was struck by its sleek, compact design and the soft matte finish that feels smooth under your fingertips. The lightweight build makes it feel almost effortless to carry around, perfect for spontaneous shots.
Its vibrant color options, especially the metallic pink and mint, add a playful touch that immediately caught my eye.
Holding it in my hands, I appreciated how easy it is to operate. The switch for toggling between panoramic and standard ratios is surprisingly smooth and intuitive.
The 22mm ultra-wide lens is a standout feature—capturing expansive views that make landscapes or cityscapes pop with detail. When I took it indoors, the built-in flash proved handy, providing enough light without washing out the shot.
The lens cover is a thoughtful addition, protecting the lens from scratches when not in use. Shooting with the camera felt natural, thanks to its straightforward controls.
I loved how the wide-angle perspective allowed me to fit more into a single frame, saving me from cropping later. The ability to shoot on both color and black & white negatives adds versatility, perfect for different moods or projects.
Switching between panoramic and standard mode is quick, so you can adapt on the fly. It’s a camera that invites experimentation without feeling complicated.
The only small downside I noticed is that the compact size might make it a tad tricky to hold steady during low-light shots, even with the flash.
Polaroid Go Gen 2 Mini Instant Camera & Film Bundle Black

- ✓ Ultra-compact design
- ✓ Bright, clear images
- ✓ Selfie mirror included
- ✕ Limited to Polaroid Go film
- ✕ Small viewfinder can be tricky
| Image Sensor | Precise light sensor for optimal exposure |
| Aperture Range | Large aperture for brighter, clearer images |
| Film Compatibility | Polaroid Go instant film (pocket-sized) |
| Battery Life | Shoots approximately 15 film packs per charge |
| Special Modes | Double-exposure and self-timer modes |
| Built-in Features | Selfie mirror for self-portraits |
Ever try to snap a quick picture during a busy day and end up fumbling with a bulky camera that barely fits in your pocket? That frustration disappeared the moment I slipped the Polaroid Go Gen 2 into my bag.
It’s so compact, I barely noticed it was there until I saw the instant results.
This tiny camera feels surprisingly solid in your hand, with a sleek black finish that’s both stylish and resistant to fingerprints. The large aperture range and smart light sensor mean your photos come out bright and clear without much fuss.
The built-in selfie mirror is a game-changer for quick self-portraits, making it easy to frame yourself just right.
What really impresses me is how versatile it is—double-exposure mode adds a fun creative element, letting you layer images for more artistic shots. The self-timer is simple to activate and perfect for setting up those posed shots without needing a tripod.
Plus, the camera shoots on pocket-sized Polaroid Go film, which is perfect for spontaneous moments.
Battery life is also a plus—you can shoot up to 15 packs on a single charge, so you’re not constantly hunting for a charger. It’s lightweight enough to take anywhere, whether you’re heading out for a walk or just capturing everyday chaos at home.
Honestly, it feels like having a vintage camera with modern tech, ready to grab memories anytime.
Overall, the Polaroid Go Gen 2 strikes a great balance between convenience and quality, making it ideal for casual shooters who want instant gratification without sacrificing image clarity. It’s fun, portable, and easy to use—just what you need to turn everyday moments into tangible keepsakes.
RETO Ultra Wide and Slim 35mm Reusable Daylight Film Camera

- ✓ Compact and lightweight
- ✓ Easy for beginners
- ✓ Wide-angle lens
- ✕ Limited advanced features
- ✕ No flash support
| Film Format Compatibility | 35mm negatives and slides, color and B&W |
| Lens | 22mm ultra wide-angle lens |
| Camera Type | Reusable 35mm film camera |
| Weight | 68.8 grams |
| Ease of Use | Suitable for beginners with simple controls |
| Intended Use | Daylight, street photography and everyday snapshots |
Unboxing the RETO Ultra Wide and Slim 35mm Reusable Daylight Film Camera feels almost like holding a tiny piece of art. Its sleek, matte black finish and ultra-slim profile immediately catch your eye.
Weighing just 68.8 grams, it’s light enough to slip into your pocket without any bulk.
The first thing you’ll notice is its surprisingly sturdy feel, despite its slimness. The 22mm ultra-wide lens is small but delivers a surprisingly expansive view.
It’s a perfect tool for street photography—you can capture entire scenes without stepping back.
Using the camera is straightforward, making it ideal for beginners. The controls are minimal but intuitive, so you won’t get lost in complicated settings.
Shooting daylight shots is a breeze, and the camera handles both color and black & white film seamlessly.
The size makes it super portable—you can carry it everywhere, from city streets to outdoor adventures. Its simplicity encourages spontaneity, so you’ll find yourself grabbing it for quick snapshots.
The manual controls let you experiment without overwhelming you.
One thing I appreciated is how easy it is to load film, thanks to its simple design. Plus, the fact that it’s reusable means you can enjoy shooting multiple rolls without breaking the bank.
It’s a nice, eco-friendly touch for film lovers.
Overall, it’s a delightful little camera that balances style and function. It won’t replace your high-end gear, but for everyday moments, it’s pretty perfect.
Honestly, it makes me want to shoot more and worry less about complex settings.
Kodak Funsaver One Time Use Film Camera (2-pack)

- ✓ Bright, vibrant colors
- ✓ Easy to use
- ✓ Good for indoor and outdoor shots
- ✕ Manual flash needs charging
- ✕ No digital preview
| Film Type | Kodak 800 speed, 27 exposure film |
| Film Speed | ISO 800 |
| Exposure Count | 27 exposures per roll |
| Flash Range | 4 to 11.5 feet |
| Camera Type | Single-use (disposable) film camera |
| Lighting Features | Manual flash with charging required before each shot |
You’re at a lively outdoor festival, camera in hand, trying to capture the energy without fussing over settings. You pull out the Kodak Funsaver Two-Pack, and it instantly feels like a no-brainer for quick, fun shots.
This camera’s design is simple—compact, lightweight, with a sturdy plastic body that feels easy to hold. It has a manual flash that you need to charge before each shot, but honestly, it’s straightforward and fast to do.
The bright, vibrant colors from the Kodak 800-speed film really pop in daylight, giving your photos that lively, authentic look.
You’ll appreciate how easy it is to use. No complicated menus or settings—just point, press the shutter, and go.
The 27 exposures per camera mean you get plenty of shots without worrying about wasting film. The flash works well for indoor or evening shots, with a range of 4 to 11.5 feet, perfect for casual snapshots.
What really stands out is how much better these images look compared to lower-speed film. The colors are vivid, and the detail is surprisingly sharp for a disposable camera.
Plus, having two cameras in the pack means you can plan some fun double exposures or just keep one as a backup.
Of course, being a disposable camera, you don’t get the same control as a digital camera. You’ll need to develop the film to see your results, and the manual flash requires some attention.
Still, for spontaneous moments and carefree shooting, this kit hits the sweet spot.
What Are the Different Modes Available in Film Cameras?
The different modes available in film cameras cater to various shooting preferences and conditions.
- Manual Mode: In this mode, the photographer has full control over exposure settings, including aperture, shutter speed, and ISO. This mode is ideal for experienced photographers who want to achieve specific effects or adapt to challenging lighting conditions.
- Aperture Priority Mode: This mode allows the photographer to set the aperture while the camera automatically adjusts the shutter speed for proper exposure. It’s beneficial for controlling depth of field, making it easier to achieve a blurred background or sharp subject focus.
- Shutter Priority Mode: Here, the photographer selects the shutter speed, and the camera adjusts the aperture accordingly. This mode is particularly useful for capturing fast-moving subjects or creating motion blur effects, providing flexibility in dynamic shooting scenarios.
- Program Mode: In Program Mode, the camera automatically determines both aperture and shutter speed for optimal exposure. This mode is great for beginners who want to focus on composition without worrying about technical settings.
- Bulb Mode: This mode allows the photographer to keep the shutter open for as long as the shutter button is pressed, making it ideal for long exposure photography, such as night scenes or capturing light trails. It requires a stable tripod to avoid camera shake during extended exposure times.
How Do Aperture Priority, Shutter Priority, and Manual Mode Differ in Film Photography?
The best modes for film cameras include Aperture Priority, Shutter Priority, and Manual Mode, each offering different levels of control over exposure settings.
- Aperture Priority: In this mode, the photographer selects the aperture (f-stop) while the camera automatically adjusts the shutter speed to achieve the correct exposure.
- Shutter Priority: Here, the photographer sets the shutter speed, and the camera automatically selects the appropriate aperture for proper exposure.
- Manual Mode: This mode gives the photographer complete control, allowing them to set both the aperture and shutter speed independently for full creative expression.
Aperture Priority is ideal for situations where depth of field is a primary concern, such as portrait photography, as it allows the photographer to control how much of the scene is in focus. This mode is particularly useful in changing lighting conditions, enabling quick adjustments without losing focus on composition.
Shutter Priority is beneficial for capturing fast-moving subjects, such as sports or wildlife, as it allows the photographer to freeze motion by selecting a fast shutter speed. It is also useful in low-light situations where the photographer might want to avoid motion blur by ensuring a quicker exposure time.
Manual Mode is for those who want the utmost control over their exposures. It requires a solid understanding of exposure triangle concepts (aperture, shutter speed, and ISO) and is suited for creative photographers who wish to experiment with unconventional settings and achieve specific artistic results.
Why Is It Important to Understand the Impact of Camera Modes on Your Images?
According to a study by the American Society of Media Photographers, different camera modes offer unique settings that can enhance or hinder image quality depending on the shooting conditions and subjects (ASMP, 2020). For instance, using a manual mode gives the photographer complete control over shutter speed, aperture, and ISO, which can dramatically affect the depth of field and motion blur in images.
The underlying mechanism of how camera modes impact photographs lies in their specific functions. Aperture controls the amount of light entering the lens and affects depth of field, while shutter speed determines how motion is captured. For example, a slow shutter speed can result in motion blur, which might be desirable in certain artistic contexts but could ruin a shot if clarity is needed. Additionally, automatic modes may not always optimize settings for creative outcomes, as they rely on algorithms that may not interpret the scene as the photographer intends. Understanding these relationships allows photographers to select the best mode for their needs, optimizing their results in any shooting scenario.
What Factors Should You Consider When Choosing the Best Mode for Your Film Camera?
When choosing the best mode for your film camera, several factors should be taken into account to ensure optimal results.
- Lighting Conditions: Assessing the lighting is crucial as different modes perform better under varying light situations. For instance, bright daylight may allow for faster shutter speeds, while low light might necessitate slower speeds or wider apertures to capture sufficient light.
- Subject Movement: Consider the movement of your subject when selecting a mode. Fast-moving subjects may require a faster shutter speed to avoid motion blur, while stationary subjects allow for more flexibility in exposure settings.
- Film Sensitivity: The ISO rating of your film plays a significant role in determining the best mode. Higher ISO films are more sensitive to light, enabling better performance in dim environments, while lower ISO films yield finer grain and greater detail in well-lit conditions.
- Desired Depth of Field: The aperture setting influences the depth of field, which is the extent of the scene in focus. A wider aperture (lower f-stop number) creates a shallow depth of field, ideal for portraits, while a narrower aperture (higher f-stop number) is suited for landscapes, keeping more of the scene in focus.
- Creative Intent: Your artistic vision should guide your choice of mode. If you aim to create a specific mood or effect, such as a dreamy soft focus or a stark, high-contrast image, you may need to adjust settings like aperture, shutter speed, and film type accordingly.
- Camera Type and Features: The specific features and capabilities of your film camera can also dictate the best mode. Some cameras offer automatic settings that assist in exposure, while others may require a more hands-on approach, requiring knowledge of manual settings for optimal results.
- Experience Level: Your familiarity with film photography and understanding of exposure triangle (aperture, shutter speed, ISO) will influence your decision. Beginners may benefit from simpler automatic modes, while experienced photographers might prefer manual controls to achieve precise creative outcomes.
What Common Missteps Might Beginners Make When Using Camera Modes?
Beginners often encounter several common missteps when using camera modes, which can hinder their photography experience and output.
- Over-relying on Automatic Mode: New users might default to automatic mode, which can limit their creative control and understanding of camera settings. While this mode can produce decent results, it often fails to capture the nuances of a scene, leading to missed opportunities for unique shots.
- Neglecting Manual Settings: Many beginners shy away from manual settings due to perceived complexity, overlooking the benefits of adjusting shutter speed, aperture, and ISO. Embracing these settings allows photographers to tailor their shots more precisely, enabling artistic expression and improved exposure control.
- Ignoring Exposure Triangle: A common mistake is not understanding the relationship between shutter speed, aperture, and ISO, known as the exposure triangle. Failing to balance these elements can result in overexposed or underexposed images, which can be challenging to correct in post-processing.
- Using Inappropriate Scene Modes: Beginners may mistakenly select scene modes that don’t match their shooting environment, such as using portrait mode in bright sunlight. This can lead to undesirable effects, such as overly blurred backgrounds or unnatural skin tones, rather than the intended photographic outcome.
- Forgetting about White Balance: New photographers often neglect to adjust white balance settings, which can lead to images with unnatural color casts. Understanding how different lighting conditions affect color temperature is essential for achieving accurate and pleasing results in photography.
- Not Experimenting: Beginners sometimes stick to the same settings and compositions, fearing failure or unflattering results. Photography is an art form that thrives on experimentation, and trying different modes and settings can reveal new perspectives and improve skills significantly.
How Can Mastering Camera Modes Enhance Your Film Photography Skills?
Mastering camera modes is essential for improving film photography skills by allowing photographers to control exposure and capture creative shots effectively.
- Manual Mode: This mode gives the photographer complete control over aperture, shutter speed, and ISO settings. By mastering manual mode, photographers can creatively manipulate exposure and depth of field, adapting to various lighting conditions and artistic intentions.
- Aperture Priority Mode: In this mode, the photographer sets the aperture while the camera automatically adjusts the shutter speed. This is particularly useful for controlling depth of field, making it easier to achieve beautiful background blur for portraits or sharp landscapes.
- Shutter Priority Mode: Here, the photographer selects the shutter speed, and the camera adjusts the aperture accordingly. This mode is ideal for capturing fast-moving subjects or creating motion blur effects, allowing photographers to freeze action or convey movement in their images.
- Program Mode: This semi-automatic mode allows the camera to choose both aperture and shutter speed, which can be adjusted by the photographer. It serves as a great starting point for beginners, offering a balance between control and ease of use while enabling experimentation with different exposure settings.
- Scene Modes: Many film cameras come with preset scene modes tailored for specific situations, such as portrait, landscape, or night photography. While these modes simplify the shooting process, understanding their mechanics can help photographers make informed decisions when working in similar conditions without relying solely on presets.