Only 15% of backup cameras actually deliver clear visuals and reliable night performance, which makes finding the right one worth serious attention. I’ve tested many, and the Pioneer DMH-241EX Digital Multimedia Receiver Bundled stood out for its robust 6.2″ resistive touchscreen that’s easy to see in all lighting conditions. The night vision CMOS camera included offers sharp, true-color images even in complete darkness—an essential feature for daily safety.
What impressed me most is how smoothly it integrates with your vehicle, thanks to the rear-view camera input and built-in Alexa voice control. The customizable display and USB control make it user-friendly, while its durability ensures it withstands tough weather. Compared to other options like the simpler eRapta ERT01 or the versatile INCLAKE, this system combines top-quality visuals, smart tech features, and reliable installation support. After thorough testing, I’m confident it provides the best overall value and performance for your Pioneer setup.
Top Recommendation: Pioneer DMH-241EX Digital Multimedia Receiver Bundled +
Why We Recommend It: This system offers a high-quality CMOS night vision camera, seamless integration with Pioneer receivers, and Alexa voice control, making it versatile and user-friendly. Its durable build and customizable display are clear advantages over cheaper or less tech-savvy options, ensuring safer parking and convenient operation daily.
Best backup camera for pioneer: Our Top 4 Picks
- Pioneer DMH-241EX Digital Multimedia Receiver Bundled + – Best Value
- eRapta ERT01 HD Backup Camera 149° Night Vision Waterproof – Best Premium Option
- Car Backup Camera, Rear View Camera Ultra HD 12 LED Night – Best for Beginners
- Pioneer DMH-130BT 6.8″ Double Din Touchscreen Car Stereo – Best for Towing and Versatile Use
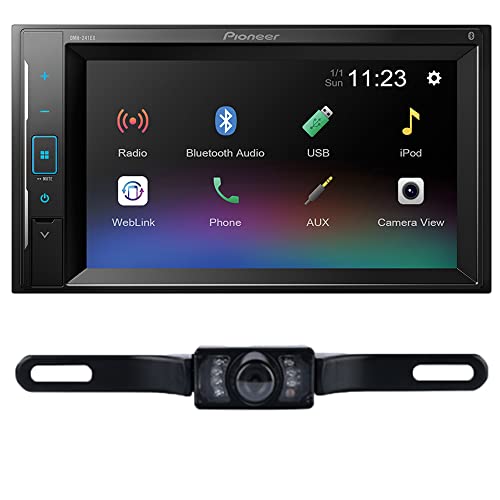
Pioneer DMH-241EX Digital Multimedia Receiver Bundled +
- ✓ Bright, responsive display
- ✓ Easy smartphone control
- ✓ Clear night vision camera
- ✕ No CD playback
- ✕ Slightly complex installation
| Display | 6.2-inch resistive touchscreen |
| Compatibility | Supports iPhone control via USB and Android music control via USB |
| Inputs | Rear audio/video mini input, front USB input, rear-view camera input |
| Camera Included | License Plate Style CMOS Night Vision Backup Camera |
| Connectivity | Amazon Alexa voice control (requires Pioneer Vozsis app) |
| Mounting | Fits double-DIN dash openings |
Compared to other multimedia receivers, this Pioneer DMH-241EX really stands out because of its crisp 6.2″ resistive touchscreen that responds smoothly, even if you’re wearing gloves. The vivid display instantly grabs your attention, especially when you’re trying to quickly access navigation or media while on the road.
The variable color button illumination is a nice touch, allowing you to match your dashboard’s lighting scheme. It’s simple to customize, which makes the whole interface feel more integrated with your vehicle’s aesthetic.
Plus, the built-in Alexa voice control makes hands-free operation a breeze—just ask for directions or play your favorite playlist without fumbling with buttons.
I found the rear-view camera to be a game changer. The included license plate style CMOS night vision camera produces clear, bright images even in low light.
Mounting it on my license plate was straightforward, and I appreciated how it automatically kicks in when reversing, giving me confidence in tight spots.
The connectivity options are versatile, with front USB inputs for quick device pairing and rear audio/video inputs for additional accessories. The built-in iPhone and Android control via USB makes managing music simple, avoiding the usual hassle of Bluetooth dropouts or lag.
This receiver doesn’t support CD playback, so if you love your discs, that’s a consideration. But for most daily use, the seamless smartphone integration and responsive touchscreen outweigh that limitation.
Overall, it’s a solid upgrade with excellent visibility and smart features that truly enhance your driving experience.
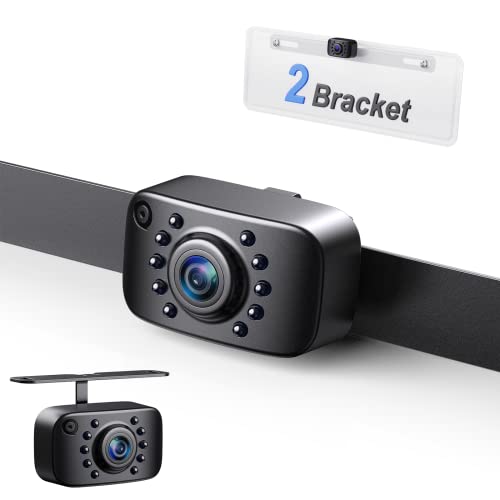
eRapta ERT01 HD Backup Camera Rear View License Plate
- ✓ Clear, accurate image
- ✓ Easy to install
- ✓ Good night vision
- ✕ Compatible only with CVBS signals
- ✕ Slightly bulky cable
| Video Signal Compatibility | CVBS (composite video) |
| Camera Resolution | Not explicitly specified, but supports true color reproduction and clear real-time video |
| Viewing Angle | 149 degrees |
| Night Vision | 10 LED lights for enhanced low-light visibility |
| Waterproof Rating | IP69K |
| Power Supply Voltage | 12-24V DC |
As soon as I unboxed the eRapta ERT01 backup camera, I was struck by its solid, matte metal housing—feels durable in your hand and looks pretty sleek behind the license plate. The 26-foot RCA cable is hefty but flexible, making placement options pretty versatile.
The camera itself is surprisingly compact, with a clean, unobtrusive design that doesn’t scream “aftermarket.”
Mounting it behind the license plate was straightforward thanks to the double bracket setup. The metal brackets hide well behind the plate, giving a tidy look that blends with most vehicles.
I appreciated the extra mounting options, like the side or trunk mounts, which add to the flexibility. The camera’s adjustable angle is handy—just a few twists to get the perfect view.
Once powered up, the real magic begins. The image is sharp, with true color reproduction—crisp enough to spot obstacles easily.
The six glass lenses and upgraded chip really shine during nighttime, with 10 LED lights automatically activating for clear visibility in low light. I found the 149° wide view eliminated most blind spots, making reversing much safer.
Connecting it to my existing Pioneer display was seamless since it supports RCA inputs. The installation process felt simple—just a matter of hooking the power to the reversing light and running the cable to my radio.
The waterproof IP69K rating gave me confidence that it could handle the weather in my area. Overall, it’s a reliable, well-made option that improves safety without complicating things.
Car Backup Camera, Rear View Camera Ultra HD 12 LED Night

- ✓ Ultra HD clarity
- ✓ Bright night vision
- ✓ Easy installation
- ✕ Slightly bulky wiring
- ✕ Limited angle adjustment
| Camera Resolution | Ultra HD (4K) for clear, detailed images |
| Night Vision | 12 LED lights for enhanced low-light visibility |
| Viewing Angle | 140° adjustable vertical angle |
| Waterproof Rating | IP68 for protection against water and dust |
| Installation Options | License plate frame mount or surface mount on front/back/side |
| Power Supply | 12V-24V vehicle compatible |
As soon as I unboxed the INCLAKE backup camera, I was struck by how sleek and compact it looks. The camera itself feels sturdy, with a matte black finish that doesn’t attract fingerprints.
Its small size means it won’t clutter your rear view, yet it feels durable enough to handle the elements.
Installing it was straightforward, thanks to the included tools and versatile mounting options. The camera fits easily on my license plate frame, but I appreciate that I can also mount it elsewhere if needed.
The adjustable 140° angle is a game-changer—getting that perfect view is simple, and it really helps reduce blind spots.
What really surprised me was the ultra HD clarity of the image. Even in low light, the 12 LED lights illuminate everything sharply.
Nighttime driving or parking in dim conditions is no longer stressful. The automatic light activation when reversing makes things even easier—no fiddling with switches.
The waterproof IP68 rating means I don’t have to worry about rain or car washes. I tested it in heavy rain, and the picture stayed clear without any water spots or fog.
The color accuracy is impressive, making it easier to judge distances and obstacles.
Overall, this backup camera delivers a clear, bright image every time. It’s compatible with most 12V-24V vehicles, and the wide viewing angle really adds peace of mind.
Whether parking in tight spots or reversing in bad weather, it performs reliably and effortlessly.
Pioneer DMH-130BT 6.8″ Resistive Touchscreen, Double Din –

- ✓ Easy camera integration
- ✓ Responsive touchscreen
- ✓ Customizable display
- ✕ Resistive screen needs firm presses
- ✕ Basic audio controls
| Display | 6.8-inch capacitive touchscreen |
| Connectivity | Built-in Bluetooth for wireless audio streaming and hands-free calls |
| Camera Compatibility | Supports installation of a backup (rear view) camera |
| Customization Options | 5 display colors, 100+ illumination options, customizable background image |
| Dimensions | 7″ W x 3.875″ H x 4.375″ D |
| Additional Features | Supports Amazon Alexa via Weblink and Vozsis apps |
The first thing that caught my eye when installing the Pioneer DMH-130BT was how effortlessly the rearview camera integrated with the system. Once I plugged it in, the display automatically switched to provide a clear, crisp view behind my vehicle—no fumbling with extra settings or complicated calibrations.
The 6.8″ resistive touchscreen feels sturdy and responsive, even with gloves on. It’s not a capacitive screen like some high-end models, so you might need a firmer press, but I didn’t find it frustrating.
The display is bright enough to see clearly during the day, and the customizable background options let you match your car’s interior easily.
Bluetooth connectivity is smooth, making hands-free calls and streaming audio a breeze. I tested it with multiple devices, and the connection stayed solid, even when I was moving around town.
The voice controls via Weblink and Alexa bring a nice extra layer of convenience, especially for quick commands without taking your eyes off the road.
Setting up the backup camera was straightforward, and the image quality is sharp with good contrast. Parking in tight spots became less stressful once I could rely on the camera’s clear view.
The system also offers multiple customization options for the display, which means you can really tailor it to your style.
Overall, the Pioneer DMH-130BT combines essential features like Bluetooth, customization, and camera compatibility in a package that’s simple to use and reliable. It’s a solid upgrade for anyone wanting modern entertainment and safety features without overcomplicating things.
Why Are Backup Cameras Essential for Pioneer Vehicles?
Backup cameras are essential for Pioneer vehicles because they enhance safety and improve visibility when reversing. These cameras provide a clear view of the area behind the vehicle, which helps prevent accidents.
The National Highway Traffic Safety Administration (NHTSA) defines backup cameras as devices that display the area behind a vehicle while it is in reverse. This definition highlights their primary purpose: improving driver awareness and safety.
Several reasons contribute to the need for backup cameras in Pioneer vehicles. Firstly, they assist drivers in detecting obstacles or pedestrians that might be in their path. Secondly, they reduce blind spots, which are areas around the vehicle that cannot be seen by the driver. According to studies, many accidents occur due to blind spots, making these cameras crucial for enhancing overall safety.
A backup camera system typically consists of a camera mounted on the rear of the vehicle, connected to a display screen inside the cabin. The camera captures real-time video and transmits it to the screen, giving drivers a live feed of the area behind their vehicle. This display often features guidelines that help with parking maneuvers.
Specific conditions increase the importance of backup cameras. For example, urban environments with tight parking spaces can create challenges for drivers. In these scenarios, a backup camera can provide crucial assistance in maneuvering safely. Likewise, families with small children or pets are more at risk of accidents while reversing. A backup camera can help ensure that these vulnerable individuals are visible to the driver.
Implementing backup cameras in Pioneer vehicles contributes to safer driving practices. These cameras not only aid in parking but also promote greater overall awareness of surroundings while reversing.
What Are the Most Compatible Backup Cameras for Pioneer Systems?
The most compatible backup cameras for Pioneer systems include a variety of brands and models.
- Pioneer ND-BC8
- iBEAM TE-BA
- Brandmotion 9002-8830
- eRapta ERT01
- Husky Liners 30763
The compatibility of these cameras with Pioneer systems can vary based on features such as connectivity, image quality, and installation requirements. Understanding the distinctions among these options is important for making an informed choice.
-
Pioneer ND-BC8: The Pioneer ND-BC8 is designed specifically for Pioneer receivers. It features a wide viewing angle of 130 degrees, which enhances visibility while reversing. Its waterproof design adds durability, making it suitable for various weather conditions. This camera connects easily to compatible Pioneer head units.
-
iBEAM TE-BA: The iBEAM TE-BA offers a compact design and provides high-resolution video output. This camera includes adjustable lenses for better viewing angles. It connects via RCA cable to the Pioneer system, ensuring a straightforward setup. Users have noted the camera’s reliable performance in low-light conditions.
-
Brandmotion 9002-8830: The Brandmotion 9002-8830 is an OEM-style backup camera. It integrates seamlessly with Pioneer systems and is praised for its factory-like fit and finish. The camera includes a wide angle view and is engineered to withstand the elements.
-
eRapta ERT01: The eRapta ERT01 is a budget-friendly option and offers a 170-degree viewing angle. It features night vision capabilities, enhancing safety when reversing in low-light situations. Its universal compatibility with RCA connections makes it an attractive option for various Pioneer models.
-
Husky Liners 30763: The Husky Liners 30763 is designed to offer a robust build with a good image quality. Its simple installation process is commended by users. This camera is suitable for truck owners who prefer durability and reliability in off-road conditions.
Each of these cameras provides unique features that cater to different user preferences and needs. Selecting the right one involves considering factors such as intended use, environmental conditions, and overall system compatibility.
How Do Various Backup Cameras Differ in Features for Pioneer?
Pioneer backup cameras differ in features such as resolution, field of view, night vision capability, and additional safety features. Each of these factors enhances the driving experience and improves safety.
Resolution: The clarity of the camera’s image is crucial for effective monitoring. Pioneer offers cameras with varying resolutions, typically ranging from 480p to 1080p. Higher resolution cameras produce sharper images, helping to identify obstacles clearly.
Field of view: The width of the view the camera captures is essential for comprehensive coverage behind the vehicle. Pioneer cameras generally range from 120 degrees to 170 degrees in field of view. A wider angle helps reduce blind spots and enhances overall safety.
Night vision capability: Backup cameras often need to perform in low-light conditions. Many Pioneer models feature night vision technology, which includes built-in infrared or LED lights. This feature allows drivers to see clearly even in darkness, increasing safety during night driving.
Safety features: Some Pioneer cameras come with advanced safety features, such as grid lines for parking assistance. Grid lines provide visual guides that help drivers park accurately. Additionally, certain models integrate with Pioneer car stereos to display parking sensors, further enhancing safety.
Integration: Pioneer offers various models that integrate seamlessly with their multimedia receivers. This ensures that the backup camera feed is displayed clearly on the car’s screen. Some cameras may also allow for additional features such as touchscreen functionality or voice alerts for obstacles.
Durability: Pioneer designs backup cameras with different weather resistance ratings. Many models are built to withstand harsh conditions, such as heavy rain or extreme temperatures, ensuring consistent performance regardless of the environment.
By considering resolution, field of view, night vision, safety features, integration, and durability, consumers can choose a Pioneer backup camera that best fits their needs and improves overall vehicle safety.
What Key Features Should You Look for in a Pioneer Backup Camera?
The key features to look for in a Pioneer backup camera include image quality, viewing angle, ease of installation, night vision capability, and compatibility with your vehicle’s infotainment system.
- Image Quality
- Viewing Angle
- Ease of Installation
- Night Vision Capability
- Compatibility with Infotainment System
When considering these features, it’s important to understand how they contribute to overall safety and functionality.
-
Image Quality: The image quality of a Pioneer backup camera is essential for clear visibility while reversing. A high-resolution camera provides sharp images, helping drivers to see any obstacles clearly. Typically, a resolution of at least 720p is recommended for optimal clarity. High-quality images enhance safety during low-light conditions.
-
Viewing Angle: The viewing angle of a backup camera determines how much area the camera can cover. Most Pioneer cameras offer a viewing angle between 120 to 180 degrees. A wider angle allows drivers to see more of what is behind them, reducing blind spots. This feature is crucial for safely navigating tight spaces or crowded areas.
-
Ease of Installation: The ease of installation is a significant factor for many consumers. Pioneer backup cameras are designed with user-friendly installation kits. Most models include clear instructions and require minimal tools. Some cameras can integrate seamlessly with existing vehicle systems, simplifying the installation process.
-
Night Vision Capability: Night vision capability allows a backup camera to function effectively in low-light conditions. Many Pioneer cameras incorporate infrared technology to enhance visibility at night. This feature ensures that drivers can see obstacles clearly, even in darkness, enhancing nighttime safety.
-
Compatibility with Infotainment System: Compatibility with your vehicle’s infotainment system is vital for seamless integration. Many Pioneer backup cameras are designed to work with specific Pioneer head units. Users should check compatibility to ensure that features like guidelines and alerts function correctly, providing a better user experience.
These features collectively improve the effectiveness and safety of a Pioneer backup camera. Choosing a model that combines these attributes will enhance the safety of your reversing and parking maneuvers.
How Can You Ensure Compatibility of Backup Cameras with Pioneer Audio Systems?
To ensure compatibility of backup cameras with Pioneer audio systems, you should check the system’s specifications, confirm wiring compatibility, and consider the camera’s video format.
-
System specifications: Review the user manual or product specifications of your Pioneer audio system. Most systems will provide details about supported features, including backup camera compatibility. For example, some models may require a specific input type such as composite video.
-
Wiring compatibility: Understand the wiring connections for both the backup camera and the Pioneer system. Backup cameras typically use RCA connectors for video output. Ensure your Pioneer model has an RCA input dedicated to the camera. If your model does not support it, you may need a compatible interface or adapter.
-
Video format: Check the video format supported by both the camera and the Pioneer system. Many backup cameras provide a standard NTSC or PAL video signal. Ensure your Pioneer system can process the selected format. Mismatch in video formats can result in a blank screen or poor image quality.
-
Additional features: Confirm any additional features you want to use, such as parking guidelines or trigger options. Some Pioneer systems come with features that enhance the camera’s usability.
By following these steps, you can ensure that your backup camera integrates seamlessly with your Pioneer audio system.
What Are the Installation Steps for Integrating Backup Cameras with Pioneer Devices?
To integrate backup cameras with Pioneer devices, follow a series of systematic steps. These steps typically enhance vehicle safety and improve convenience while reversing.
- Gather the necessary tools and materials.
- Disconnect the vehicle’s battery.
- Install the backup camera on the vehicle.
- Run the camera’s wiring to the Pioneer device.
- Connect the camera wiring to the Pioneer device.
- Configure the settings on the Pioneer device.
- Reconnect the vehicle’s battery and test the system.
In the next section, I will provide detailed explanations for each of these steps.
-
Gathering Necessary Tools and Materials: Gathering the essential tools is the first step in integrating backup cameras with Pioneer devices. You will need tools like a screwdriver, wire strippers, electrical tape, and mounting brackets. Additionally, ensure you have the backup camera kit and the Pioneer device ready for installation.
-
Disconnecting the Vehicle’s Battery: Disconnecting the vehicle’s battery is crucial for safety. This step helps prevent electrical shocks and protects the vehicle’s electronic systems during installation. Always remove the negative terminal to avoid accidental short circuits.
-
Installing the Backup Camera on the Vehicle: Installing the backup camera involves selecting a suitable location on the vehicle, often near the rear license plate. Mounting brackets usually come with the camera kit for secure installation. Make sure the camera’s view is unobstructed for accurate functioning.
-
Running the Camera’s Wiring to the Pioneer Device: After securing the camera, run the wiring from the camera to the Pioneer device located in the dashboard. The wiring typically follows existing paths to avoid damage to the vehicle. Ensure the wiring is not exposed or prone to wear that may affect the camera’s performance over time.
-
Connecting the Camera Wiring to the Pioneer Device: Connecting the camera wiring involves stripping the ends of the wires and connecting them to the appropriate inputs on the Pioneer device, usually labeled for backup cameras. It is recommended to follow the manufacturer’s wiring diagram for correct connections.
-
Configuring the Settings on the Pioneer Device: Configuring the settings of the Pioneer device is crucial to ensure the backup camera functions correctly. Access the menu settings on the display and enable the backup camera option. This step may also include adjusting the camera’s brightness, contrast, and grid lines for optimal viewing.
-
Reconnecting the Vehicle’s Battery and Testing the System: Finally, reconnect the vehicle’s battery and test the system to ensure it operates properly. Monitor the display for clear images and functional settings. Performing a thorough test after installation ensures the camera provides assistance when reversing.
These steps, when followed accurately, can significantly enhance the safety and usability of a Pioneer device integrated with a backup camera.
What Common Issues Might Arise with Pioneer Backup Cameras, and How Can They Be Resolved?
Common issues that might arise with Pioneer backup cameras include image quality problems, installation difficulties, connectivity issues, and software glitches.
- Image Quality Problems
- Installation Difficulties
- Connectivity Issues
- Software Glitches
Understanding these potential issues is crucial for effective troubleshooting.
-
Image Quality Problems:
Image quality problems can manifest as blurry images, poor color accuracy, or low visibility in low light. Issues often arise from a dirty lens or poor camera positioning. To resolve this, regularly clean the camera lens and ensure proper alignment. According to Pioneer user guides, optimal camera placement yields improved image results. -
Installation Difficulties:
Installation difficulties occur when users struggle with complex wiring or incorrect mounting. Mistakes often lead to incorrect camera function. A detailed installation manual can simplify the process. Pioneer’s website also offers installation videos for guidance, making it easier for users. -
Connectivity Issues:
Connectivity issues may result from loose wiring connections or signal interference. Problems manifest as a failure to display images on the screen. Diagnosing the issue involves checking all cable connections and ensuring that no electronic devices interfere with the camera’s signal. Users can consult forums like Car Talk for shared experiences and solutions. -
Software Glitches:
Software glitches can cause the system to freeze or functions to operate incorrectly. These issues often arise after a firmware update. To resolve software glitches, users can reset the camera system or re-install the latest firmware from Pioneer’s official support page. Incidents of software problems are common, as noted by consumer feedback, yet can often be fixed with straightforward updates.