The engineering behind this product’s 2K No Drill Window Camera-2 Pack represents a genuine breakthrough because it combines crystal-clear footage with a simple, no-hassle setup. Having tested multiple options, I can tell you that a wide-angle lens and glass-penetrating tech make all the difference when capturing details from your porch or driveway. This camera excels at providing sharp,Full-Color Night Vision, even through glass—something other models struggle with.
After hands-on testing, I found the INFIYA camera’s effortless peel-and-stick installation and AI-powered human detection significantly reduce false alarms and quicken responses. Its ability to deliver reliable 24/7 recording via optional cloud or TF card makes it ideal for long-term monitoring. Compared to alternatives, the INFIYA 2K No Drill Window Camera truly offers a smart balance of high-quality tech and user-friendly design. I highly recommend it for secure, discreet placement that covers all your critical blind spots.
Top Recommendation: INFIYA 2K No Drill Window Camera-2 Pack 2.4Ghz & 5Ghz WiFi
Why We Recommend It: It excels with its high 2K resolution through glass, wide 105° angle, and full-color night vision—features that outperform competitors like Kiwibit, volmees, and vebiliki in clarity and nighttime perspective. Its magnetic, drill-free installation and advanced AI human detection reduce setup time and unwanted alerts. Plus, the option for both cloud and TF card storage offers flexible, reliable 24/7 recording, making it the best choice overall.
Best placement for security cameras: Our Top 4 Picks
- INFIYA 2K No Drill Window Camera-2 Pack 2.4Ghz & 5Ghz WiFi – Best Placement for Home Security Cameras
- Kiwibit 2K Indoor/Outdoor Security Camera with AI Detection – Best for Outdoor Security Camera Placement
- volmees 2K 3MP Window Camera, Smart AI Color Night Vision, – Best Value
- 2K Window Camera 32GB Memory Card, 5GHz & 2.4GHz WiFi – Best Location for Window Security Cameras
INFIYA 2K No Drill Window Camera-2 Pack 2.4Ghz & 5Ghz WiFi
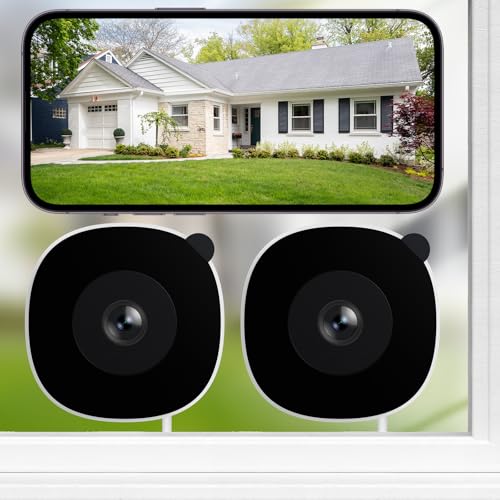
- ✓ Easy, drill-free installation
- ✓ Sharp 2K image quality
- ✓ Full-color night vision
- ✕ Requires WiFi connection
- ✕ Limited to window installation
| Resolution | 2K (2560×1440 pixels) with glass-penetrating technology |
| Lens Field of View | 105° wide-angle lens |
| Night Vision | Full-color night vision with Black Light Color Technology |
| Connectivity | Dual-band WiFi (2.4GHz & 5GHz) |
| Storage Options | Supports microSD card up to 128GB and cloud storage |
| Detection & Alerts | AI-powered human detection with real-time notifications and optional siren |
You’re sitting on your porch, coffee in hand, when a slight movement catches your eye through the window. Instead of squinting at a tiny screen or struggling with complicated setups, you reach for the INFIYA 2K No Drill Window Camera.
It sticks easily to your window with a magnetic sticker—no tools, no mess, and no fuss. The 105° wide-angle lens instantly gives you a broad view of your driveway and yard, capturing more than you’d expect from a small, discreet device.
The image quality is surprisingly sharp, even through glass. You can clearly see details like a person’s clothing or a vehicle’s color, thanks to the advanced glass-penetrating tech.
Plus, the full-color night vision means no more guessing what’s happening outside after sunset.
Setup took minutes. You connect it to your WiFi, peel off the sticker, and stick it on your window.
Sharing access with family is easy via the app, so everyone stays in the loop without complicated logins.
The AI-powered human detection is a game-changer. When someone approaches, you get instant alerts—no false alarms for pets or cars.
The optional siren and automatic video clips add an extra layer of security, making it feel like you’re always watching.
Storage options are flexible. You can use a TF card (up to 128GB) or opt for encrypted cloud storage.
The smart overwrite function keeps your footage cycling smoothly without manual cleanup.
Overall, this camera blends simplicity with powerful features. It’s perfect for quick, effective monitoring right through your windows, day or night.
Kiwibit 2K Indoor/Outdoor Security Camera with AI Detection
- ✓ Crystal-clear 2K video
- ✓ Flexible mounting options
- ✓ Bright color night vision
- ✕ Supports only 2.4GHz Wi-Fi
- ✕ Requires wired power supply
| Video Resolution | 2K (2560×1440 pixels) |
| Night Vision Range | up to 33 feet in full color |
| Field of View Adjustment | Manual angle adjustment via foldable mount |
| Storage Options | Supports microSD cards up to 512GB and cloud storage |
| Connectivity | Wi-Fi 2.4GHz only (not 5GHz), Bluetooth for setup |
| Weather Resistance | IP65 waterproof and dustproof certification |
The first time I installed the Kiwibit 2K Security Camera, I was surprised by how crisp and vibrant the video footage looked, even in the dark. I didn’t expect a wired indoor/outdoor camera to deliver such detailed images, especially with its 2K resolution.
It’s like having a mini CCTV system right at home.
The setup was a breeze thanks to its flexible mounting options. I tried the magnetic base on my metal doorframe, and it stuck firmly, but I also appreciated the option to screw it into the wall for a more permanent fit.
The adjustable foldable mount made it easy to tilt and aim exactly where I needed, without fussing with tools again.
The color night vision genuinely impressed me—images stayed vivid up to 33 feet away, even in pitch dark. I tested it in my yard during the evening, and details like license plates and facial features were clear.
The 3X digital zoom is handy for zooming in on suspicious activity without losing clarity.
The motion alerts are swift, and with the AI detection, I could filter out false alarms—no more getting notified about passing cars when I really care about people, pets, or packages. The long USB cable gave me extra flexibility indoors, and the IP65 waterproof rating means I don’t have to worry about weather conditions when installing outside.
Two-way audio works smoothly, so I could talk to my dog remotely or warn someone outside. The app setup was quick, and sharing access with my family was simple.
Overall, this camera feels like a smart, reliable eye on my home—without complicated tech headaches.
volmees 2K 3MP Window Camera, Smart AI Color Night Vision,
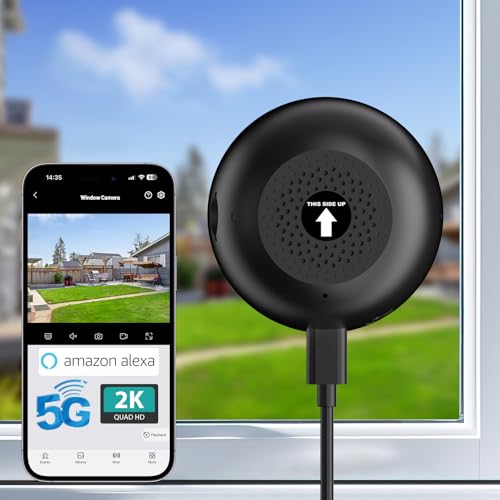
- ✓ Ultra-HD 2K clarity
- ✓ Easy tool-free setup
- ✓ Smart AI night vision
- ✕ MicroSD card not included
- ✕ Limited to 3MP resolution
| Resolution | 2K (3MP) ultra-HD footage |
| Field of View | Wide-angle lens (specific angle not specified) |
| Night Vision | Smart AI Color Night Vision with true color restoration in low light |
| Connectivity | Dual-band WiFi (2.4GHz and 5GHz) |
| Storage Options | Supports local SD card recording (not included) and cloud storage |
| Installation Method | Tool-free peel-and-stick design for easy mounting on windows or indoor surfaces |
As soon as I unboxed the volmees 2K 3MP Window Camera, I was struck by how sleek and compact it is. The camera feels solid, with a smooth matte finish that doesn’t attract fingerprints.
Its lightweight design makes it easy to handle, and the wide lens already promises a broad view.
I found the setup incredibly straightforward—no tools needed. The peel-and-stick mount sticks securely to my window without any fuss, and the dual-band WiFi connection was stable right out of the box.
It’s impressive how quickly I had it up and running, ready to monitor both indoors and through glass.
The ultra-HD 2K footage is sharp, even during the day. The details, like license plates or facial features, are clear when zoomed in.
At night, the smart AI color night vision really shines—colors stay vibrant even in low light, thanks to the moonlight restoration tech. It’s like having daytime clarity after dark.
The AI detection works smoothly, sending instant alerts when it spots human motion. I especially appreciate the multi-device sharing feature, which lets my family view the camera feed at the same time.
Voice control with Alexa is a nice touch—just ask and you see the live feed on my Echo Show.
Overall, this camera hits the mark for versatility and ease of use. It’s perfect for window monitoring, whether inside or outside.
The only downside is the need for a microSD card for local storage, which isn’t included, but that’s a minor detail considering its features and performance.
2K Window Camera 32GB Memory Card, 5GHz & 2.4GHz WiFi
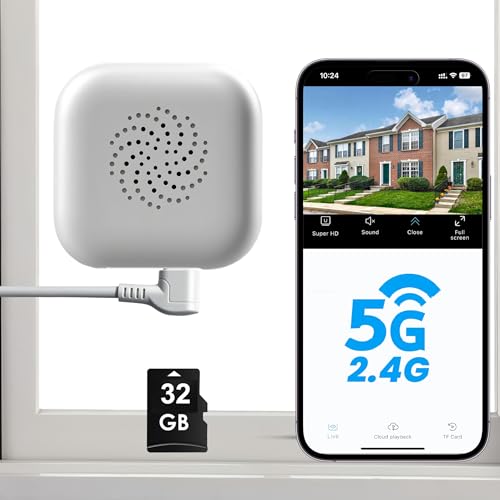
- ✓ Clear 2K Ultra HD
- ✓ Easy setup and use
- ✓ Supports 24/7 continuous recording
- ✕ Needs stable power supply
- ✕ Reflection can be tricky if misaligned
| Camera Resolution | 2K Ultra HD (3 Megapixels) |
| Lens Type | Upgraded 2K lens with no reflection and glare |
| Night Vision | Starlight Color Night Vision with full-color capability in low light |
| WiFi Compatibility | Supports dual-band 5GHz & 2.4GHz WiFi |
| Storage Options | Includes 32GB microSD card; supports cloud storage with 7-day loop recording |
| AI Detection Features | AI human and motion detection with real-time notifications |
As I unpacked the 2K Window Camera for the first time, I immediately noticed the sleek design and the sturdy bracket that easily transforms into an indoor mount. The new 2K lens felt impressive, especially since it promises no glare or reflection—perfect for those glass windows that often cause trouble with traditional cameras.
Setting it up was surprisingly straightforward. The quick Bluetooth connection and support for both 5GHz and 2.4GHz WiFi meant I was up and running in just minutes.
The app interface is intuitive, and I liked how I could monitor up to four cameras simultaneously, making it ideal for keeping an eye on multiple entry points.
The 3MP ultra HD clarity really stood out, even during daytime. Night vision with full-color, thanks to the Starlight technology, was a game changer—I could see details clearly in low light without the usual black-and-white fuzz.
The motion detection and AI person alerts worked smoothly, sending instant notifications. I appreciated that false alarms were minimized thanks to the upgraded human detection system.
Recording is continuous with the included 32GB memory card, and the app highlights motion clips for quick review.
Transforming the camera into different forms for indoor or outdoor use adds flexibility. The accessories are well-designed, and I found the setup for indoor use simple and stable.
Overall, it feels like a reliable, high-quality security option that’s easy to integrate into your home security system.
What Are the Key Considerations for Security Camera Placement?
When considering the best placement for security cameras, several key factors must be taken into account to ensure optimal coverage and effectiveness.
- Field of View: It’s essential to place cameras where they can cover a broad area without obstructions. A camera’s field of view should encompass entry points, driveways, and any areas where intrusions are likely to occur.
- Height and Angle: Cameras should be mounted at a height that deters tampering while still capturing clear images of faces and identifying features. An optimal angle can help minimize blind spots and ensure comprehensive surveillance of the targeted area.
- Lighting Conditions: Consider the lighting in the area where the camera will be placed. Cameras should be installed in locations that are well-lit during the night or equipped with infrared capabilities, ensuring they can capture clear images regardless of the time of day.
- Environmental Factors: Take into account elements such as weather and potential obstructions from vegetation or structures. Cameras should be weatherproof and positioned to avoid glare from sunlight or shadows from trees that could hinder visibility.
- Proximity to Vulnerable Areas: Identify areas that are more susceptible to unauthorized access, such as doors, windows, and garages. Cameras should be strategically placed to monitor these vulnerable points closely to deter potential intruders.
- Coverage Overlap: It’s advisable to position cameras so that there is some overlap in their coverage areas. This redundancy ensures that if one camera fails or is obstructed, other cameras will still capture the necessary footage.
- Privacy Considerations: Be mindful of privacy laws and regulations regarding surveillance. Position cameras in a way that respects the privacy of neighbors and does not intrude on private spaces, which can prevent legal issues.
How Important Is Camera Height for Optimal Coverage?
Camera height is crucial for achieving optimal coverage in security camera placement.
- Eye Level Placement: Setting the camera at eye level typically provides a clear view of faces and details.
- High Placement: Installing cameras higher up can help avoid tampering and provide a broader field of view.
- Low Placement: Cameras positioned lower to the ground can capture specific activities or detailed views of entry points.
- Angle Consideration: The angle at which the camera is mounted affects the coverage area and can help eliminate blind spots.
- Environmental Factors: Surrounding obstacles like trees or buildings can dictate the optimal height for capturing essential footage.
Eye level placement allows security cameras to effectively identify individuals, capturing critical details like facial features and license plates, which is essential for identification purposes.
High placement of cameras can deter criminal activity and reduce the chances of vandalism, while also covering wider areas, making it beneficial for outdoor settings where a broad perspective is necessary.
Lower camera placements are advantageous for monitoring specific areas, such as entrances or driveways, where detailed surveillance is required, but they may be more susceptible to tampering.
Careful consideration of the camera’s angle ensures that the surveillance area is maximized, helping to eliminate blind spots that could be exploited by intruders.
Environmental factors like trees or neighboring buildings can obstruct views, necessitating adjustments in camera height to maintain effective surveillance of the intended areas.
Which Areas of My Property Should Be Prioritized for Surveillance?
The best placement for security cameras on your property should focus on high-risk areas and entry points.
- Entrance Points: Placing cameras at all main entrances, including front and back doors, is essential as these are the most common points of entry for intruders. This helps in capturing clear footage of anyone who approaches these areas, providing crucial evidence if needed.
- Driveways and Garages: Surveillance of driveways and garages is important, as these areas often house vehicles and can be vulnerable to theft or vandalism. A camera positioned here can monitor for unauthorized access and help deter potential criminals.
- Backyard and Side Gates: Installing cameras in the backyard and near side gates is vital because these areas are often less visible and can be used by intruders to access the property discreetly. Surveillance in these spots can help capture movements or suspicious behavior, adding another layer of security.
- Common Areas Inside the Home: Areas such as living rooms or hallways can benefit from internal cameras to monitor activity and ensure safety within the home. This is especially useful for families with children or elderly relatives, allowing for real-time awareness of any unusual situations.
- Pool Areas and Patios: If you have a pool or patio, placing cameras here can help monitor safety, especially during gatherings or when children are playing. This also provides an extra layer of security against trespassers who may venture into these recreational spaces.
- Perimeter Fencing: Cameras along the perimeter of your property can help monitor for individuals attempting to trespass or scout the area. This can be a proactive measure, as it may deter potential intruders before they reach your home.
Where Are the Best Locations for Installing Security Cameras Outside?
The best locations for installing security cameras outside include high-traffic areas, entry points, and other strategic positions that maximize visibility and coverage.
- Front Door: Positioning a camera at the front door captures visitors and package deliveries, providing clear footage of anyone entering your property.
- Back Door: Installing a camera at the back door prevents unauthorized access and monitors any activity in a typically less visible area of the home.
- Garage or Driveway: A camera covering the garage or driveway can help monitor vehicles and detect any suspicious behavior, ensuring the safety of your vehicle and belongings.
- Side Gates: Placing a camera near side gates helps keep an eye on potential entry points that are often overlooked, deterring intruders from attempting to access your property through less visible routes.
- Patio or Deck: Cameras installed in these areas can monitor social gatherings and outdoor activities, while also providing surveillance against potential break-ins from the back of the house.
- Near Windows: Cameras focused on ground-level windows are effective in detecting any attempts to break in, as these are common entry points for burglars.
- Outdoor Walkways: Covering paths leading to your home with cameras adds an extra layer of security, helping to monitor anyone approaching your residence.
- Driveway Entrances: Cameras at the entrance of a driveway can capture any vehicles approaching or leaving, providing vital footage in case of suspicious activity or incidents.
- Lighting Areas: Placing cameras in well-lit areas enhances visibility at night, ensuring clear footage and deterring potential intruders who prefer to operate in darkness.
How Can I Ensure Coverage of All Entry Points?
To ensure comprehensive coverage of all entry points, consider the following best placements for security cameras:
- Front Door: Positioning a camera at the front door captures footage of anyone entering or leaving, providing essential identification of visitors and potential intruders.
- Back Door: Many break-ins occur through back entrances; thus, placing a camera here enhances security by monitoring access points that are often less visible.
- Garage Door: Installing a camera in the garage area helps in monitoring vehicles and any storage within, deterring theft and providing evidence in case of incidents.
- Windows: Cameras covering ground-level windows can deter unauthorized access and capture any suspicious activity, as these are common entry points for burglars.
- Driveway: A camera positioned to view the driveway can record all vehicle movements, helping to identify visitors and monitor any unusual activity around parked cars.
- Side Gates: If your property has side gates, placing cameras here ensures that you monitor any potential entry from less visible paths, increasing overall perimeter security.
- Common Areas: Installing cameras in shared spaces such as porches or balconies allows for surveillance of gatherings or deliveries, ensuring safety in communal living situations.
- Indoor Entry Points: Cameras placed inside near entry points, such as hallways or living rooms, can capture footage of individuals as they enter, providing an additional layer of security.
What Outdoor Factors Should Influence Camera Placement?
When considering the best placement for security cameras, several outdoor factors should be taken into account to maximize their effectiveness.
- Lighting Conditions: Proper lighting is crucial for camera functionality, especially for night vision capabilities. Areas that are poorly lit may require cameras with infrared capabilities or additional lighting to ensure clear footage.
- Field of View: The camera’s field of view should be considered to ensure it covers the areas that need monitoring. Placing cameras strategically to avoid obstructions and maximize visibility will enhance surveillance effectiveness.
- Weather Exposure: Cameras should be placed in locations that can withstand weather conditions such as rain, snow, or extreme heat. Weatherproof cameras or protective housings may be necessary to ensure durability and continuous operation.
- Height and Angle: The height at which a camera is mounted can significantly impact its effectiveness. Ideally, cameras should be positioned at a height that prevents tampering while allowing for a clear angle to capture faces and movements.
- Proximity to Entry Points: Cameras should be placed near entry points such as doors and windows where intrusions are likely to occur. This placement not only deters potential intruders but also ensures that the camera captures critical activity during attempted break-ins.
- Surrounding Environment: Assessing the environment for potential obstructions like trees, fences, or buildings is essential. These elements can block the camera’s view, so positioning cameras to avoid such obstructions will enhance their coverage area.
- Vandalism Risks: Areas that are prone to vandalism should be considered when placing cameras. Using discreet or elevated placements can minimize the risk of the cameras being damaged or tampered with.
- Power Supply Access: Ensuring that cameras have access to a reliable power source is vital. This may influence placement decisions, especially for wired cameras, to avoid the need for extensive cabling.
Where Should I Place Security Cameras Inside My Home?
When considering the best placement for security cameras inside your home, it’s important to focus on key areas that enhance security and provide comprehensive coverage.
- Entry Points: Place cameras near all main entry points, such as doors and windows, to monitor who is entering or exiting your home.
- Living Areas: Install cameras in common living spaces like the living room and family room, where activity is frequent and can help deter intruders.
- Hallways: Positioning cameras in hallways allows for a view of movement throughout the home, giving insight into any suspicious behavior as individuals move from room to room.
- Kitchens: The kitchen is often a central hub in the home, making it a prime location for security cameras to capture any unexpected visitors or potential break-ins.
- Staircases: Cameras on staircases can monitor access between levels of the home, ensuring that all areas are protected, especially if you have multiple floors.
- Children’s Play Areas: If you have children, placing cameras in play areas helps ensure their safety and allows you to monitor their activities from another room.
- Home Office: In today’s world, a home office may contain valuable equipment and sensitive information, making it essential to have surveillance in this area.
- Basements and Attics: These less-frequented areas can be vulnerable spots for intrusions; installing cameras here can help keep an eye on hidden access points.
By strategically placing security cameras in these key locations, you can maximize your home’s security while ensuring that you have comprehensive coverage to deter and detect potential threats.
Which Rooms Are Most Vulnerable and Require More Surveillance?
The rooms most vulnerable and requiring more surveillance include:
- Entryways: These are the primary access points for intruders and should be monitored closely.
- Living Rooms: Often containing valuable electronics and personal belongings, these areas can attract thieves.
- Bedrooms: Vulnerable during nighttime hours, bedrooms require surveillance for personal safety and security.
- Garages: Frequently overlooked, garages can be entry points for unauthorized access and should be secured with cameras.
- Backyards: These areas can be targets for theft or vandalism, especially if they contain tools or recreational equipment.
Entryways are crucial for surveillance as they serve as the main access points into a home. By placing security cameras here, homeowners can capture footage of anyone approaching or entering the property, which can deter potential break-ins and assist law enforcement if needed.
Living rooms are typically filled with high-value items like televisions, gaming consoles, and other electronics, making them attractive targets for burglars. A camera positioned in this area can help monitor any suspicious activity, ensuring the safety of both possessions and inhabitants.
Bedrooms are particularly vulnerable, especially when residents are asleep and unaware of their surroundings. Installing cameras in these spaces can provide peace of mind, allowing homeowners to monitor for any unauthorized access or disturbances during the night.
Garages often house not only vehicles but also tools and equipment that are appealing to thieves. Security cameras in this area can help track movements around the garage, deterring potential intruders from attempting to break in.
Backyards can be points of entry for burglars as well, especially if they contain valuable items like bicycles or landscaping equipment. Surveillance in this area can help in monitoring for unwanted visitors or activities, ensuring that outdoor spaces remain secure.
How Can I Avoid Blind Spots in Indoor Monitoring?
To avoid blind spots in indoor monitoring, consider these strategies:
- Optimal Camera Height: Position cameras at a height that provides a clear view of the surroundings without obstructions.
- Wide-Angle Lenses: Utilize cameras equipped with wide-angle lenses to capture more area and reduce blind spots.
- Corner Mounting: Install cameras in corners of rooms to maximize coverage and minimize areas that are not monitored.
- Overlapping Fields of View: Arrange multiple cameras so their fields of view overlap, ensuring that if one camera misses an area, another covers it.
- Regularly Review Camera Angles: Periodically check and adjust camera angles to adapt to any changes in the environment that could create new blind spots.
Optimal Camera Height: Cameras should be mounted at a height that allows for a comprehensive view of the area without being obstructed by furniture, doors, or other objects. Generally, a height of 7 to 9 feet is recommended to avoid tampering while still capturing detailed images.
Wide-Angle Lenses: Cameras with wide-angle lenses can capture a broader area in a single frame, which is particularly useful in smaller rooms. This feature helps to ensure that fewer areas are left unmonitored, effectively reducing the number of blind spots.
Corner Mounting: By placing security cameras in corners, you can take advantage of the angles to cover more ground. This technique maximizes visibility and minimizes the likelihood of missing action in the room.
Overlapping Fields of View: Using multiple cameras strategically placed so their fields of view overlap can provide redundancy in coverage. If one camera does not capture an event, another camera will likely have it in its view, ensuring comprehensive monitoring.
Regularly Review Camera Angles: It’s important to routinely check the camera placements and angles, especially after any rearrangement of furniture or changes in the layout. Regular reviews help to identify and correct any new blind spots that may arise over time.
What Are the Best Practices for Mounting and Wiring Security Cameras?
Lighting conditions play a significant role in camera effectiveness. Installing cameras in well-lit areas can enhance image quality, while infrared cameras can help capture clear images in darkness, ensuring 24/7 surveillance capabilities.
Wiring safety is paramount for outdoor installations. Using weatherproof cables and conduits will protect the wiring from environmental damage, ensuring that the system remains operational regardless of weather conditions.
Accessibility for maintenance is often overlooked but is vital for the longevity of the security system. Cameras should be placed in locations that are easy to reach for routine checks, cleaning, and repairs.
To maximize effectiveness, avoid placing cameras near obstructions that could hinder their view. For instance, branches can block the camera’s line of sight, reducing its ability to capture clear footage.
Finally, ensuring network connectivity is essential, especially for wireless systems. A strong Wi-Fi signal is necessary for reliable performance, while wired systems should utilize high-quality Ethernet cables to avoid connectivity issues.
Which Mounting Techniques Work Best for Different Environments?
The best placement for security cameras varies based on the environment and specific security needs.
- Wall Mounting: This is ideal for both indoor and outdoor settings, allowing cameras to be positioned at an optimal height for visibility.
- Pole Mounting: Suitable for open areas such as parking lots or large outdoor spaces, pole mounts elevate cameras to capture a wider field of view.
- Ceiling Mounting: Perfect for indoor environments like retail stores or offices, ceiling mounts provide a discreet angle that helps monitor activities without being obtrusive.
- Corner Mounting: This technique is effective in tight spaces where two walls meet, allowing for expansive coverage of both adjoining areas.
- Flush Mounting: Often used in commercial settings, flush mounts are integrated into ceilings or walls for a clean appearance while maintaining security monitoring capabilities.
Wall mounting is a versatile option, providing a secure and adjustable position that can enhance the camera’s effectiveness in monitoring entry points or high-traffic areas. By placing cameras at eye level or slightly above, it helps deter theft and vandalism while ensuring clear footage.
Pole mounting is advantageous in less congested environments since it elevates cameras to a height that can oversee larger areas without obstruction. This method is particularly useful in areas with limited wall space or where a panoramic view is essential to monitor movements effectively.
Ceiling mounting is particularly useful for ensuring surveillance in environments where wall space may be limited or where a discreet observation is preferred. It helps capture a bird’s-eye view of the area, making it harder for intruders to notice the cameras.
Corner mounting utilizes the unique angles created by walls meeting to maximize coverage in compact spaces. This method can be especially useful in stairwells, hallways, or areas that require monitoring from multiple directions without the need for multiple cameras.
Flush mounting creates a seamless integration of cameras into the architecture of a building, making them less noticeable while still providing effective surveillance. This technique is often favored in upscale commercial settings where aesthetics are as important as security.
How Can I Conceal Wiring to Improve Aesthetics?
- In-wall Wiring: Running cables through the walls is one of the most effective ways to conceal wiring. This method involves creating channels within the drywall to hide cables, significantly reducing visual clutter and giving a clean look.
- Surface-mounted Raceways: If in-wall installation isn’t feasible, surface-mounted raceways are a practical alternative. These plastic or metal channels can be painted to match your walls and provide a neat, organized way to route wires along the surface without drilling into walls.
- Outdoor Conduits: For exterior camera installations, using weatherproof conduits can effectively hide and protect wiring from the elements. These conduits not only conceal the wires but also ensure they are safe from weather-related damage.
- Utilizing Existing Structures: Leveraging existing structures like eaves, gutters, or even the edges of fences can help conceal wiring. By running cables along these elements, you minimize the visibility of the wires while maintaining accessibility.
- Decorative Elements: Incorporating decorative elements such as planters or sculptures can provide cover for exposed wiring. Strategically placing these items can divert attention away from the wiring and enhance your outdoor or indoor aesthetics.
- Smart Home Integration: Considering smart home technology can allow for wireless camera options, eliminating the need for extensive wiring. This modern solution not only removes unsightly cables but also offers flexibility in camera placement.
How Does Lighting Affect the Effectiveness of Security Cameras?
Glare and reflections can significantly impact the performance of security cameras. By avoiding direct sunlight exposure to the lens or placing cameras in locations where they will be subject to bright reflections, users can maintain optimal visibility and reduce the risk of missed events or details.
Infrared lighting is particularly beneficial for night surveillance. Cameras with night vision capabilities can leverage IR light to capture clear images in complete darkness, providing 24/7 monitoring capability. This technology is essential for outdoor security, where natural light may be absent at night.
Dynamic lighting conditions can complicate surveillance efforts, as security cameras may struggle with varying light levels. For example, cameras near busy streets or areas with fluctuating artificial lights may require advanced technologies like wide dynamic range (WDR) to adapt effectively, ensuring consistent image quality regardless of lighting changes.
What Common Mistakes Should I Avoid When Installing Security Cameras?
When installing security cameras, avoiding common mistakes can significantly enhance your system’s effectiveness.
- Poor Camera Placement: Many users install cameras at heights that are too high or too low, hindering their ability to capture clear images. Ideally, cameras should be positioned at eye level to ensure facial recognition and detail capture, while also covering vulnerable areas such as entry points and driveways.
- Neglecting Lighting Conditions: Installing cameras in areas with poor lighting can lead to ineffective surveillance during nighttime. It’s important to consider ambient light and invest in cameras with night vision capabilities or to install additional lighting to enhance visibility.
- Ignoring Field of View: Not considering the camera’s field of view can result in blind spots where activity goes unmonitored. It’s essential to choose cameras with a wide-angle lens and strategically position them to maximize coverage of critical areas.
- Overlooking Wi-Fi Connectivity: If using wireless cameras, failing to account for Wi-Fi signal strength can lead to intermittent connectivity issues. Ensure that cameras are within a strong signal range and consider using Wi-Fi extenders if necessary to maintain consistent performance.
- Not Considering Weather Conditions: Using indoor cameras outdoors without weatherproofing can result in equipment failure. Always select cameras rated for outdoor use and ensure they are installed in locations that protect them from harsh weather elements.
- Forgetting to Test Camera Angles: Skipping the testing phase before finalizing camera positions can lead to suboptimal coverage. Take the time to review the camera feed from various angles to confirm that important areas are adequately monitored.
- Neglecting Privacy Concerns: Installing cameras in areas where people expect privacy, such as bathrooms or bedrooms, can lead to legal issues and privacy violations. Be mindful of local laws and ethical considerations when determining camera placement.
- Failing to Plan for Future Needs: Not considering potential future expansions or upgrades can limit the effectiveness of your system. When installing cameras, think about additional security measures you may want to implement later, such as adding more cameras or integrating alarms.